How to Use iPhone as Webcam: A Guide for Educators
- MEDIAL

- Feb 4
- 16 min read
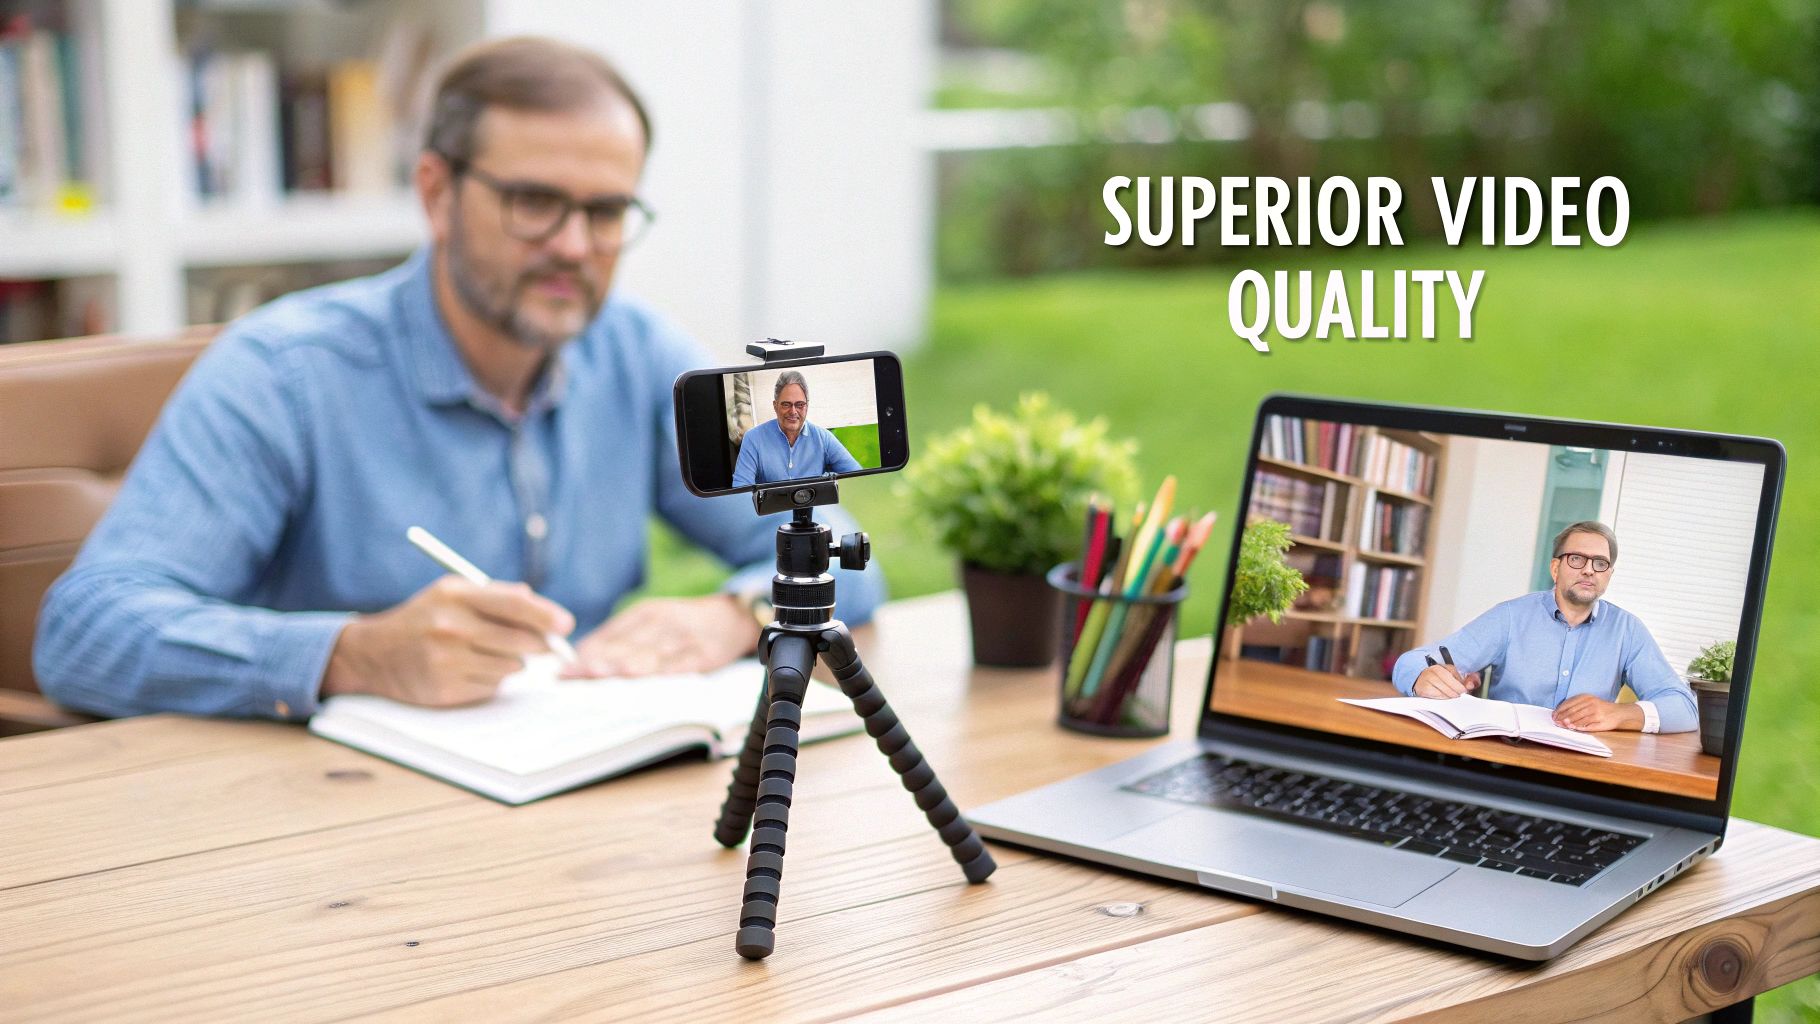
Let's be honest, the built-in webcam on your laptop is probably a bit rubbish. Grainy, poorly lit, and unflattering are words that often come to mind. But what if you could get a massive quality upgrade for your video lectures and meetings without spending a penny? The solution is likely already in your pocket.
You can easily use your iPhone as a webcam by connecting it to your computer. For Mac users, Apple's built-in Continuity Camera makes it a breeze. For Windows, a handful of great third-party apps get the job done just as well. This simple setup instantly swaps your blurry laptop camera for the powerful, high-quality camera system on your iPhone.
Why Your iPhone Is a Superior Webcam
Before we get into the nuts and bolts, it's worth taking a moment to appreciate why this is such a game-changer. Repurposing your iPhone camera can completely transform the quality of your online teaching, making live lectures on platforms like Zoom or Microsoft Teams look far more professional. When you pair that quality with a branded streaming platform like MEDIAL, the difference is night and day.
Imagine a university professor delivering a crystal-clear lecture, a world away from the fuzzy, poorly lit feed we’ve all grown accustomed to. For example, a chemistry lecturer could use the high-resolution iPhone camera to clearly show the subtle colour changes in a titration experiment, something a standard webcam would turn into a blurry mess. This simple switch can genuinely boost student engagement and makes video assignments submitted through Moodle or Canvas look polished and well-produced.
Unlocking Professional Quality Without the Cost
The most obvious win here is the immediate and dramatic jump in video quality. Your iPhone’s camera system is packed with advanced sensors and processing power that leave most built-in webcams in the dust. Suddenly, you have access to features that create a much richer viewing experience:
Higher Resolution Video: Modern iPhones shoot in beautiful 4K, providing a level of detail that makes demonstrations and presentations incredibly sharp. For an art history lecture, this means you can show the fine brushstrokes on a painting with perfect clarity.
Better Low-Light Performance: The larger sensors capture more light, which means you’ll look clear and well-defined even if your home office lighting isn't perfect. No more looking like a shadowy figure during a late-afternoon virtual seminar.
Advanced Software Features: You can tap into clever tools like Centre Stage, which automatically keeps you framed as you move, or Portrait Mode for that professional-looking blurred background. This is perfect for an active presentation where you might move to a whiteboard.
This approach is also incredibly cost-effective. Why spend £100 on a high-end external webcam when you already own a device that can do a better job? It's convenient and removes the hassle of researching, buying, and setting up extra hardware.
To put it in perspective, let's break down the technical differences.
iPhone Camera vs Standard Laptop Webcam
Feature | Typical iPhone Camera | Standard Laptop Webcam |
|---|---|---|
Resolution | Up to 4K (3840 x 2160) | 720p (1280 x 720) |
Sensor Size | Large, advanced sensors | Small, basic sensor |
Low-Light Quality | Excellent, with noise reduction | Poor, often grainy |
Frame Rate | Up to 60fps (frames per second) | Typically 30fps |
Software Features | Centre Stage, Portrait Mode | Basic image controls |
Lens Quality | High-quality glass optics | Basic plastic lens |
The table makes it clear: it's not even a fair fight. The technology in your phone is simply years ahead of what's typically built into a laptop bezel.
A Common Tool for Modern Educators
This strategy is particularly relevant for educators and students in the UK. iPhones have a dominant 49% market share of all mobile phones sold, making them a common sight in the hands of educators and trainers.
What's more, over two-thirds (69%) of 16-24-year-olds prefer iOS devices, meaning your students and younger instructors are already equipped with top-tier cameras perfect for live-streaming lessons or recording assignments. You can dig deeper into these mobile trends and their impact on education.
The core benefit is simple: you can achieve a professional, broadcast-quality look for your online courses and meetings using equipment you already own. This small change elevates your presence and helps hold your students' attention.
By using your iPhone as a webcam, you're not just finding a clever workaround; you're making a significant upgrade to your digital classroom. The improvement in video quality, combined with the practical and financial benefits, makes it a fantastic choice for any educator looking to create more engaging and effective online learning experiences.
Using Your iPhone as a High-Quality Webcam with Continuity Camera
If you’re an educator already using Apple devices, you’re in luck. Getting a broadcast-quality webcam setup is surprisingly simple, thanks to a built-in feature called Continuity Camera. It completely skips the need for extra software and creates a seamless, powerful link between your iPhone and your Mac.
Honestly, the experience is so smooth it feels a bit like magic. It’s designed to "just work" so you can focus on teaching your class, not fiddling with tech. Imagine a trainer delivering a live session on MEDIAL; they can move around the room freely while Centre Stage keeps them perfectly in the frame. This isn't just a novelty—it makes your presentations feel far more alive and engaging.
The Core Requirements for a Flawless Setup
Before you jump in, it’s worth taking a moment to check your gear. Continuity Camera relies on newer hardware and software to create that slick, wireless connection, so a quick check now will save you a headache later.
Here’s what you’ll need to have in place:
An iPhone running iOS 16 or newer. (Actionable Insight: You can check this by going to Settings > General > About on your iPhone).
A Mac updated to macOS Ventura or a later version. (Actionable Insight: Check by clicking the Apple logo in the top-left corner > About This Mac).
Both your Mac and iPhone must be signed into the same Apple ID (with two-factor authentication turned on).
Make sure Wi-Fi and Bluetooth are enabled on both devices.
These aren't arbitrary rules. They’re what allow your devices to securely talk to each other with minimal lag, ensuring your video feed is both high-quality and private.
Getting Your iPhone Camera Up and Running
Once you’ve confirmed your devices are compatible, the rest is incredibly easy. There’s no software to install or complicated pairing process. Just bring your iPhone near your Mac and get it into position.
Simply mount your iPhone on top of your Mac (a simple stand or clip works great), making sure it’s stable and in landscape mode with the rear cameras facing you.
That's it. Your Mac will automatically recognise the iPhone is nearby and ready to go. You'll see it pop up as a camera option system-wide.
Now, just open any app that uses a camera—think Zoom, Microsoft Teams, or even your web browser. Head to the video settings, and you’ll see your iPhone listed right alongside the built-in webcam. Select it, and the stunning video from your phone’s camera will instantly take over.
And for educators who also create tutorial content, this setup works beautifully alongside screen recording. If you need to show what's happening on another device, check out our guide on how to film your iPad screen—it's the perfect companion technique.
The best part about Continuity Camera is how deeply it's integrated. Once connected, your iPhone is treated like a native webcam in virtually every app on your Mac, from your LMS to your video conferencing software. No separate drivers, no hassle.
Unlocking Your iPhone's Powerful Video Effects
Continuity Camera is about more than just a better picture; it brings all of your iPhone’s clever camera tricks directly to your Mac. This is where you can really start to elevate your teaching videos.
For instance, a science teacher demonstrating an experiment in Blackboard can use Desk View to instantly create an overhead shot. It gives students a crystal-clear, top-down view of what’s happening on the desk without needing a second camera or a complicated rig.
You can access these features right from your Mac’s Control Centre:
Centre Stage: This is a must-have. It automatically pans and zooms to keep you perfectly framed, even as you move around. Practical example: A PE teacher demonstrating stretches can move freely without ever leaving the frame.
Portrait Mode: Creates a professional look by gently blurring your background, making sure the focus stays on you. Actionable insight: This is perfect for hiding a cluttered home office during a parent-teacher conference.
Studio Light: A clever effect that dims the background and brightens your face, solving tricky lighting issues without any extra gear.
Desk View: A genuinely innovative feature that uses the iPhone’s ultra-wide lens to show both your face and an overhead view of your desk at the same time.
These aren't just flashy effects; they’re practical tools that solve real problems for online educators. Whether you want a more polished look with Portrait Mode or need to show a physical object with Desk View, these powerful options are just a click away.
Connecting Your iPhone Webcam to a Windows PC
While Apple users get the slick, built-in magic of Continuity Camera, Windows users are definitely not left out in the cold. You can absolutely get that same high-quality video feed for your lectures and meetings. The solution lies in a handful of excellent third-party apps that bridge the gap between your iPhone and your Windows PC, teaching them to speak the same language.
This route takes a tiny bit more setup, but the payoff is massive. You'll transform that grainy built-in laptop camera into a sharp, professional tool that makes your online presence far more engaging. Let's walk through how to make it happen.
Choosing Your Software Bridge
To get started, you'll need two pieces of software that work together: an app on your iPhone and a matching driver or client on your Windows PC. Two of the most reliable and popular choices are Camo and EpocCam. Both are fantastic, but they cater to slightly different needs.
EpocCam (by Elgato): This is a brilliant, straightforward option. You just download the app on your iPhone and install the PC driver. Once it's running, your iPhone simply appears as a camera source in apps like Zoom, Teams, or your LMS. The free version is capped at 720p, which is still a huge upgrade, but the paid version unlocks full 1080p HD and other features.
Camo (by Reincubate): This is the more powerful, feature-rich choice. Camo gives you granular control over your video, letting you adjust zoom, exposure, white balance, and more right from your PC. It's perfect for educators who want to fine-tune their look for pre-recorded videos or important live streams.
For most educators, EpocCam is the quickest path to a much better webcam. But if you're a creator who loves having total control over the image, Camo is well worth a look.
Wired vs. Wireless: The Great Debate
One of the first decisions you'll make is whether to connect your iPhone with a USB cable or go wireless over Wi-Fi. Each has distinct advantages, and the right choice really depends on your teaching scenario.
A wired USB connection is the champion of reliability. It guarantees a stable, low-latency video feed that won't stutter if someone else in your house starts streaming a 4K movie. This makes it the perfect choice for critical live events—like a final exam review or a guest lecture—where a dropped connection just isn't an option. A huge bonus is that it also charges your iPhone, so you never have to worry about the battery dying mid-session.
On the other hand, a wireless connection offers incredible freedom. It untethers your iPhone, allowing you to place it anywhere in the room to get the perfect angle. This is brilliant for dynamic presentations, science experiments, or studio tours where you need to move the camera around. For example, a music teacher could place the phone to get a clear shot of their hands on a piano, which would be impossible with a laptop webcam. It’s ideal for recording asynchronous content where a momentary glitch isn't a disaster.
To help you decide, this quick decision tree outlines the main paths for using your iPhone as a webcam on different systems.
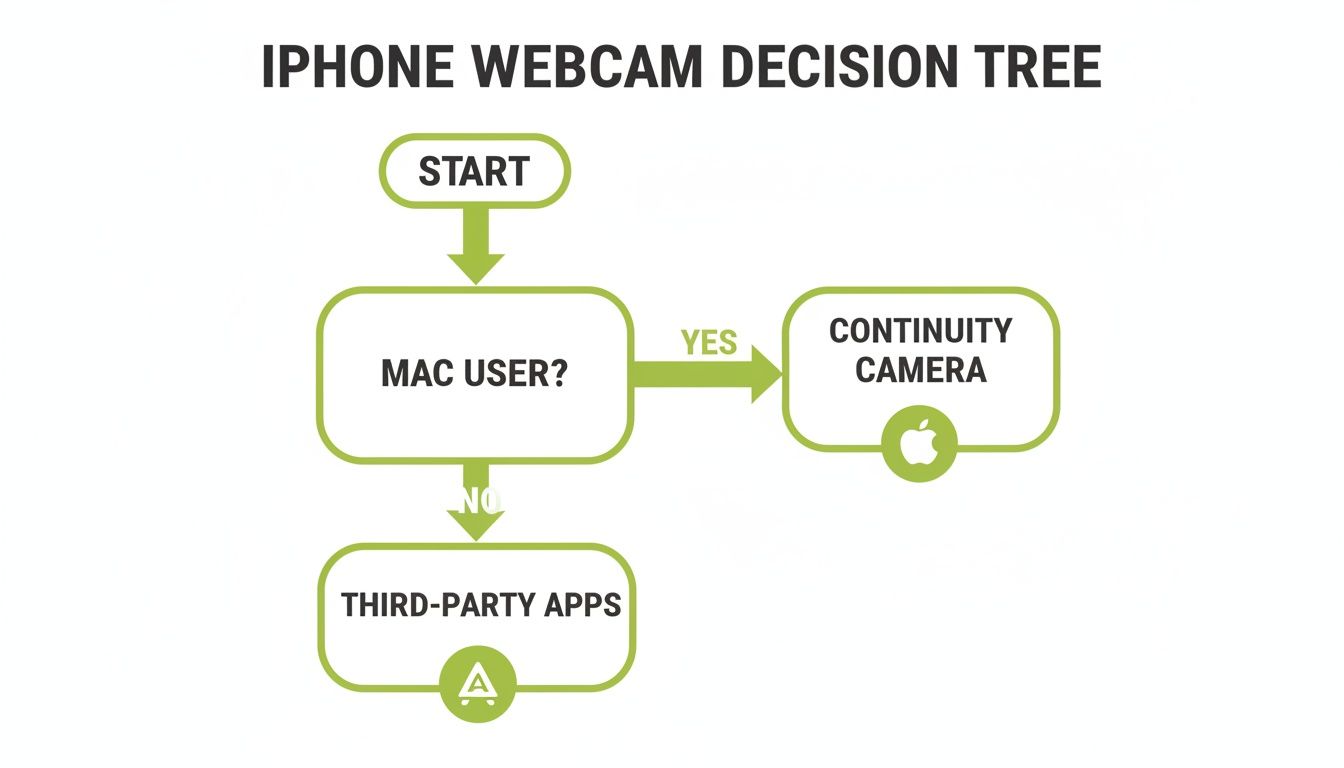
This visual guide simplifies the choice: Mac users have a seamless native option, while Windows users can achieve the same great results with a few extra steps using these third-party apps.
A Practical Scenario: Recording a Welcome Video
Let's put this into a real-world context. Imagine you're a college instructor preparing for the new term. You want to record a warm, high-quality welcome video to post in your D2L Brightspace course shell. Your laptop webcam is dim and unflattering, but you know your iPhone can produce a fantastic image.
Here’s what your workflow would look like:
First, you'd download the EpocCam app from the App Store onto your iPhone.
Next, you'd install the Elgato Camera Hub driver on your Windows laptop.
Then, you mount your iPhone on a small tripod next to the laptop, connecting it with a USB cable for maximum stability and to keep the battery topped up.
Opening EpocCam on the phone and the Camera Hub on the PC, the connection is made instantly.
Finally, you open your video recording software (like MEDIAL's capture tool), go to the video source settings, and select "EpocCam Camera" from the list.
The result is a crisp, professional welcome video that makes a brilliant first impression. The lighting looks natural, the background has a pleasing blur, and the overall quality is leagues ahead of what the built-in webcam could ever produce. This simple process elevates your asynchronous content instantly.
Integrating Your iPhone Webcam with Teaching Tools
You’ve done the hard part and successfully turned your iPhone into a high-quality webcam. So, what’s next? It’s time to actually use that powerful camera inside the teaching tools you rely on every day. This is the final piece of the puzzle, the step that makes your online lectures and recorded tutorials look polished and professional.
The good news is that once your computer recognises your iPhone as a camera—whether through Continuity Camera or a third-party app—most software will treat it just like any other webcam. It’s simply a matter of telling your teaching platform which video source you want to use.
Selecting Your iPhone Camera in Zoom and Teams
For live sessions in platforms like Zoom or Microsoft Teams, switching to your iPhone camera only takes a few clicks. It’s a tiny adjustment that makes a huge visual impact on your students and colleagues.
Before you start or join a meeting, just head over to the video settings. You can usually find this near the camera icon on the main screen or tucked away in a settings menu.
In Zoom: Click the little upward arrow next to the "Start Video" icon. A list of available cameras will pop up. Just pick your iPhone from this list—it might be named "iPhone Camera," "EpocCam," or "Camo," depending on your setup.
In Microsoft Teams: When you're on the pre-join screen, you'll see a preview of your video. Look for a settings cog or a camera dropdown menu. From there, you can easily switch from your built-in webcam to your connected iPhone.
This quick change ensures you walk into every virtual classroom or staff meeting with a crisp, clear video feed that commands attention.
Using Your iPhone with Browser-Based LMS Tools
Many Learning Management Systems (LMS) like Moodle, Canvas, and D2L Brightspace have video recording tools that run right inside your web browser. Getting your iPhone to work here is just as straightforward.
When you kick off a recording, your browser (like Chrome or Firefox) will ask for permission to access your camera and microphone. A small pop-up usually appears in the corner of your screen, showing a dropdown menu of available video sources.
All you have to do is click this dropdown and choose your iPhone camera from the list before you click "Allow." Your browser will then pull in that superior video feed for any recordings you make directly within your course modules.
A Practical Walkthrough with MEDIAL
Let's put this all together in a real-world scenario. Imagine an instructor needs to deliver a professionally branded live lecture through MEDIAL, streamed directly into their Moodle course.
Here’s how they could use their iPhone to get that high-quality webcam feed for the event:
Schedule the Event: First, the instructor logs into MEDIAL and schedules a new live event, giving it a title and description. This creates a unique streaming link they can embed right on their Moodle page.
Connect the iPhone: Using Continuity Camera on their Mac, they mount their iPhone nearby. There's no complicated software to launch; the connection just happens.
Configure the Stream: In their streaming software (like the free tool OBS), they navigate to the video source settings. They select "iPhone Camera" from the list, and instantly, the high-definition video feed appears.
Go Live: They hit "start stream," and their professional, high-quality lecture—complete with university branding configured in MEDIAL—is broadcast live to students right inside the Moodle environment.
This workflow combines the superior optics of the iPhone with the robust, secure streaming infrastructure of MEDIAL, creating an experience far beyond what a standard laptop webcam can offer.
For educators using their iPhone as a webcam, it's also worth exploring the wider strategies that make online teaching effective. You can delve deeper into the best practices for online teaching to really maximise engagement and learning outcomes. It's also helpful to see how different platforms can work together, which you can read about in our guide on MEDIAL's powerful Zoom integration.
Troubleshooting When Your Camera Isn't Found
Every now and then, you might find that your iPhone doesn't appear as a camera option. Don't panic. The fix is usually simple and doesn't require a call to the IT department.
Restart the App: The most common solution is the classic "turn it off and on again." Completely quit and restart the application (Zoom, Teams, your browser) after you've connected your iPhone.
Check Your Connection: For wired setups, make sure the USB cable is plugged in securely on both ends. If you’re going wireless, double-check that both your iPhone and computer are on the exact same Wi-Fi network.
Re-launch the Driver App: If you're using a third-party tool like EpocCam, make sure the driver software is running on your PC before you open your teaching platform.
Pro Tips for a Professional Video Setup
Turning your iPhone into a high-quality webcam is a huge first step, but the camera itself is only one part of the equation. To truly elevate your video from good to great, you need to think like a mini-studio producer. Focusing on lighting, stability, and audio will transform your presence and create a much more engaging experience for your students.
A fantastic camera in a poorly lit, shaky environment will still produce a subpar video. Fortunately, achieving a professional look and sound doesn't require a Hollywood budget; it just takes a bit of thoughtful preparation.
Master Your Lighting
Lighting is arguably the most critical element for professional-looking video. Good lighting separates a clear, engaging speaker from a silhouette hidden in shadows. You don't need expensive studio lights to make a massive difference.
The simplest and most effective setup is to place your main light source in front of you, just behind your camera. A window with natural daylight is perfect for this. If you’re recording at night or in a darker room, a simple desk lamp positioned in the same way works wonders. The one thing to avoid at all costs is sitting with a bright window behind you—that’s a surefire way to turn yourself into a dark outline.
For a more advanced (but still budget-friendly) setup, you can try a basic three-point lighting technique using lamps you already own:
Key Light: Your main, brightest light, placed slightly off to one side in front of you.
Fill Light: A secondary, less intense light on the other side to soften shadows on your face.
Back Light: A lamp placed behind you, out of shot, to create some separation from your background.
Great lighting does more than just make you visible; it conveys professionalism and helps hold your audience's attention. Even a single, well-placed light source can dramatically improve your video quality.
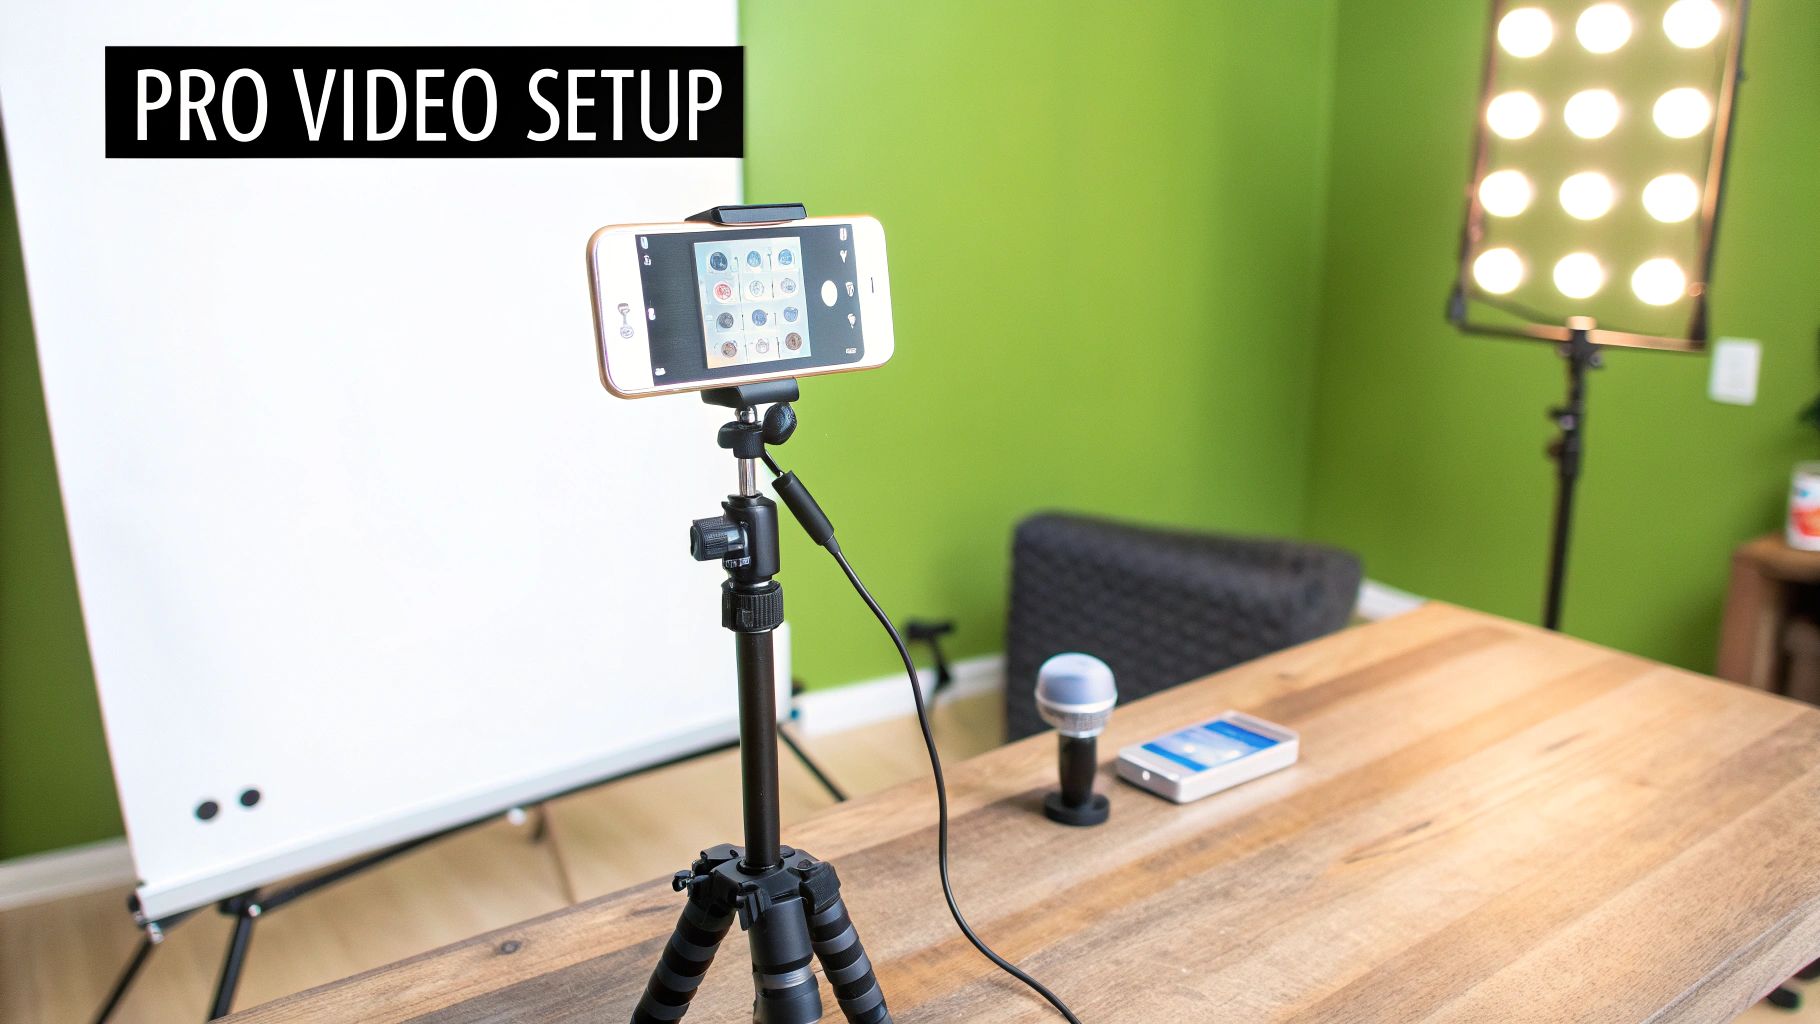
Find the Right Mount for Stability
A stable camera is non-negotiable for professional video. Shaky, handheld footage is distracting and makes your content look amateurish. Investing in a simple mounting solution ensures a steady, well-framed shot every time.
Your choice of mount really depends on your workspace. For a desk-based setup, a small, adjustable tripod is an excellent and affordable choice. It gives you the flexibility to position the iPhone at the perfect height and angle—typically just above eye level for the most flattering shot.
If you’re using your iPhone with a laptop, specialised clips that securely attach your phone to the top of your screen are a great option. Apple even sells official MagSafe mounts designed for this exact purpose, offering a very clean and stable solution for Continuity Camera users.
For some great ideas on creating engaging asynchronous content with this setup, our guide on how to produce training videos offers a proven method to engage learners and is a perfect next read.
Don't Forget About Audio Quality
Poor audio can ruin an otherwise excellent video. It's that simple. While the built-in microphones on modern iPhones are surprisingly good, they are designed to pick up sound from all around you. This means they’ll also capture distracting background noise like echoes, keyboard clicks, or traffic.
For most casual meetings, the iPhone's microphone is perfectly adequate. However, for recording important lectures or hosting a live event, an external microphone is a worthwhile investment. Even an inexpensive USB microphone or a simple lavalier mic that clips onto your shirt will provide a significant upgrade, capturing your voice with much greater clarity and richness. For more advanced techniques, this Guide to Audio Recording with iPhone: Pro Tips for Clear Sound is a fantastic resource.
By paying attention to these three areas—lighting, mounting, and audio—you can build a mini-studio setup that ensures your video content is consistently professional, clear, and compelling.
Frequently Asked Questions
Even with a simple setup, a few questions always pop up when you first start using an iPhone as a webcam. Let’s get those sorted out so you can feel completely confident.
Will My iPhone’s Battery Drain?
Yes, streaming high-quality video is thirsty work for your battery. For a quick 30-minute meeting, a fully charged iPhone will probably be fine. But for longer lectures or back-to-back classes? You'll want to plug it in.
A wired USB connection is a brilliant two-in-one solution, giving you a rock-solid video feed while charging your phone at the same time. If you're going wireless with something like Continuity Camera, just pop the iPhone on a MagSafe or Qi-compatible charger. It's an easy way to keep it topped up.
The bottom line: for any session longer than an hour, have a power source ready. It's a simple step that guarantees a dead battery won't cut your lesson short.
What Happens if I Get a Call or Notification?
This is where the different methods really show their strengths. Apple’s Continuity Camera is incredibly smart about this—it automatically silences incoming notifications and forwards any phone calls straight to your Mac. It just works, creating a professional experience without you having to do a thing.
If you're using a third-party app, especially on Windows, your best bet is to switch on a Focus mode before you start. Setting up a quick "Teaching" or "Do Not Disturb" mode on your iPhone ensures no unexpected pings or vibrations will throw you off your rhythm. Actionable insight: On your iPhone, go to Settings > Focus, and create a new custom Focus. You can name it "Webcam Mode" and set it to block all notifications and calls.
Does This Work with Older iPhones?
Compatibility really just depends on which route you take. For that seamless, built-in experience, Apple's Continuity Camera needs an iPhone XR or newer, running at least iOS 16.
But that doesn't leave older devices in the cold. Apps like EpocCam or Camo are known for supporting a much wider range of older iPhones, as long as they can handle a recent version of iOS. It's always a good idea to check the app’s website for specifics, but an iPhone from the last four or five years will almost certainly work with one of these methods. And honestly, it will still be a huge quality upgrade from your laptop’s built-in camera.
Is It Better to Go Wired or Wireless?
There’s no single right answer here—it’s all about what you need for a particular teaching moment.
A wired USB connection is your go-to for maximum reliability. It gets rid of any worries about Wi-Fi lag or stuttering video, making it the perfect choice for high-stakes events like a guest lecture or a final exam review. The fact that it’s also charging your phone is a massive plus.
On the other hand, a wireless connection gives you incredible freedom. You can position the camera absolutely anywhere without being tethered to your desk. This is perfect for dynamic presentations, hands-on demonstrations, or recording videos for students to watch later, where split-second stability isn't the top priority and you have a good Wi-Fi signal.
Ready to pair your professional new webcam setup with a powerful, secure video platform? MEDIAL integrates seamlessly with your LMS, allowing you to stream, record, and manage all your educational video content in one place. Schedule a personalised demo today to see how it can transform your teaching.
Comments