How to Film Your iPad Screen A Guide for Educators
- MEDIAL

- Jan 11
- 18 min read
Knowing how to film your iPad screen can completely change your teaching game. But which method is best? It really comes down to what you’re trying to achieve.
Whether you need to whip up a quick tutorial, show how to use a stylus, or produce a super polished, professional-quality video, there’s a straightforward way to do it. The four main ways are using the iPad's built-in recorder, filming it with an external camera, mirroring the screen to a computer, or going all-out with an HDMI capture card.
Choosing the Right Way to Film Your iPad Screen
Creating great educational videos from your iPad is more accessible than ever, but picking the right technique from the get-go is key. The method you choose affects everything—the final quality, how complex your setup will be, and whether you can even capture physical gestures on the screen.
Let’s be honest, it’s all a balancing act between simplicity and production quality. For many day-to-day teaching tasks, like a quick explainer for Moodle or a short software walkthrough, the simplest option is usually the right one. For instance, a 90-second video showing students how to submit an assignment is better done quickly with the built-in recorder than delayed by a complex setup.
Aligning Your Method with Your Goal
To help you decide, this decision tree gives you a visual guide to the questions you should be asking.
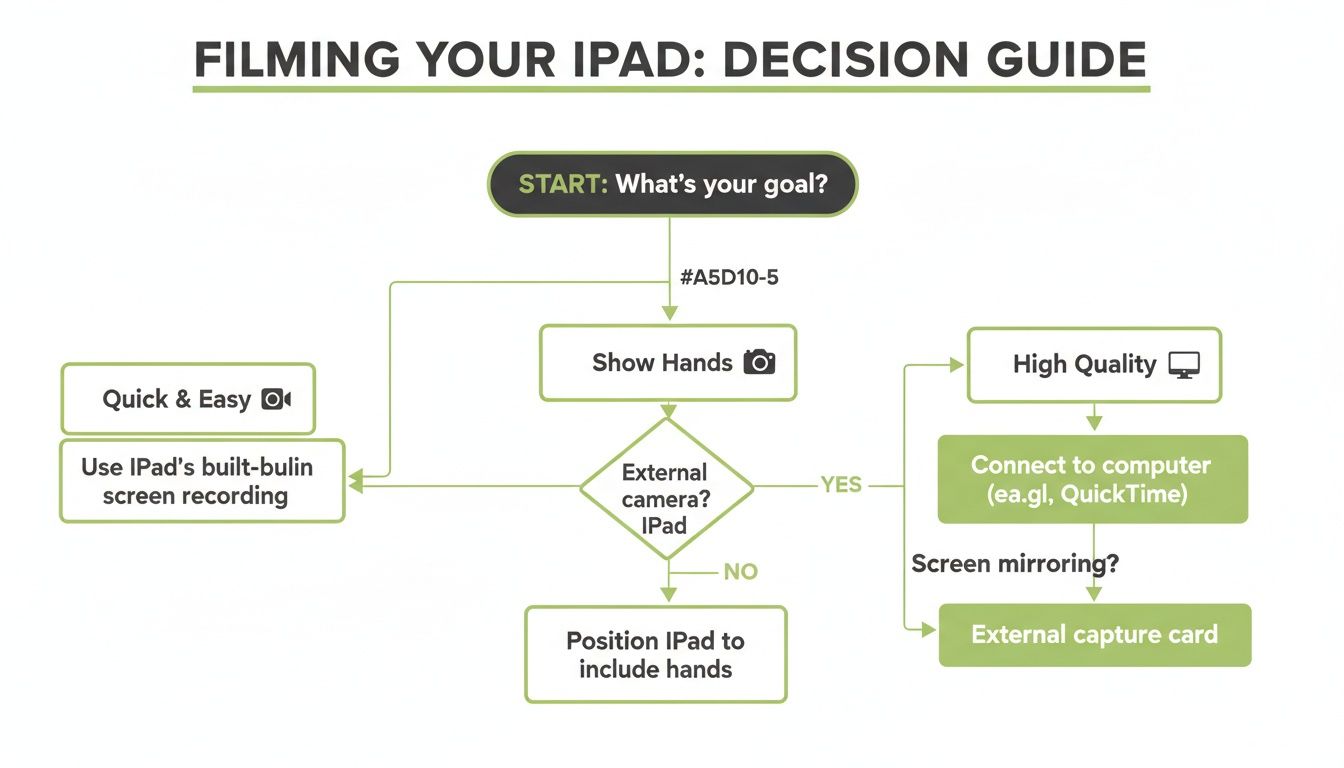
As the flowchart shows, what you need to do—whether it's getting it done fast, showing your hands, or getting crystal-clear video—is what should guide your choice.
This is especially true when you consider who's using these devices. In the UK, 25% of individuals aged 25-34 own an iPad, making them the biggest user group. This really shows how integral the iPad is to the work of young professionals and educators who are constantly creating instructional content.
So, let's break down the main approaches:
Built-in Screen Recorder: This is your go-to for speed and convenience. It's perfect for those off-the-cuff lessons or quick software demos where top-tier quality isn't the priority. For example, quickly showing a student how to access a specific resource in your university's online library.
External Camera: This is the only way to actually show your hands interacting with the screen. You'll want to use this for things like art tutorials, demonstrating specific stylus techniques in Procreate, or any lesson where that physical touch is part of the instruction.
Mirroring to a Computer: A fantastic middle-ground option that bumps up the quality. It gives you a crisp, high-resolution recording with much better audio options, making it great for creating polished training modules for a new software rollout.
HDMI & Capture Card: This is the pro-level choice. It delivers the highest possible video quality, completely free of any wireless lag or compression artefacts. This is what you'd use for live-streaming a guest lecture or recording a premium video for a paid online course.
Comparison of iPad Filming Methods
To make things even clearer, here’s a quick-glance table comparing the four methods. Use this to pinpoint the best approach for your next project.
Method | Best For | Pros | Cons |
|---|---|---|---|
Built-in Screen Recorder | Quick, simple screen captures and software demos. | Incredibly easy and fast; no extra gear needed. | Lower video/audio quality; can't show gestures. |
External Camera | Tutorials requiring hand gestures (e.g., drawing, writing). | Captures physical interaction; allows creative angles. | Requires a camera, tripod, and good lighting; potential for glare. |
Mirroring to Computer | High-quality, polished instructional videos and webinars. | Excellent video quality; uses computer's mic/webcam. | Setup is more complex; relies on a stable Wi-Fi connection. |
HDMI & Capture Card | Professional live streams and high-end course production. | The best possible video quality; zero latency. | Most expensive and complex setup; requires specific hardware. |
Ultimately, identifying your video's purpose first can save you from a lot of unnecessary hassle. A simple screen recording might be all you need for an internal training video, saving you a heap of time and effort.
Once you’ve got your footage, the next step is choosing your video platform for education, which is all about how you’ll share and manage your content within your LMS.
Now, let's dive into the step-by-step instructions for each of these methods.
Using the iPad's Built-In Screen Recorder
Sometimes, the best tool is the one you already have. When you just need to quickly show students how to navigate a new app or walk through a concept, the iPad's built-in screen recorder is an absolute lifesaver. It’s baked right into iPadOS, so there’s no software to install or extra gear to worry about. It's the perfect place to start.
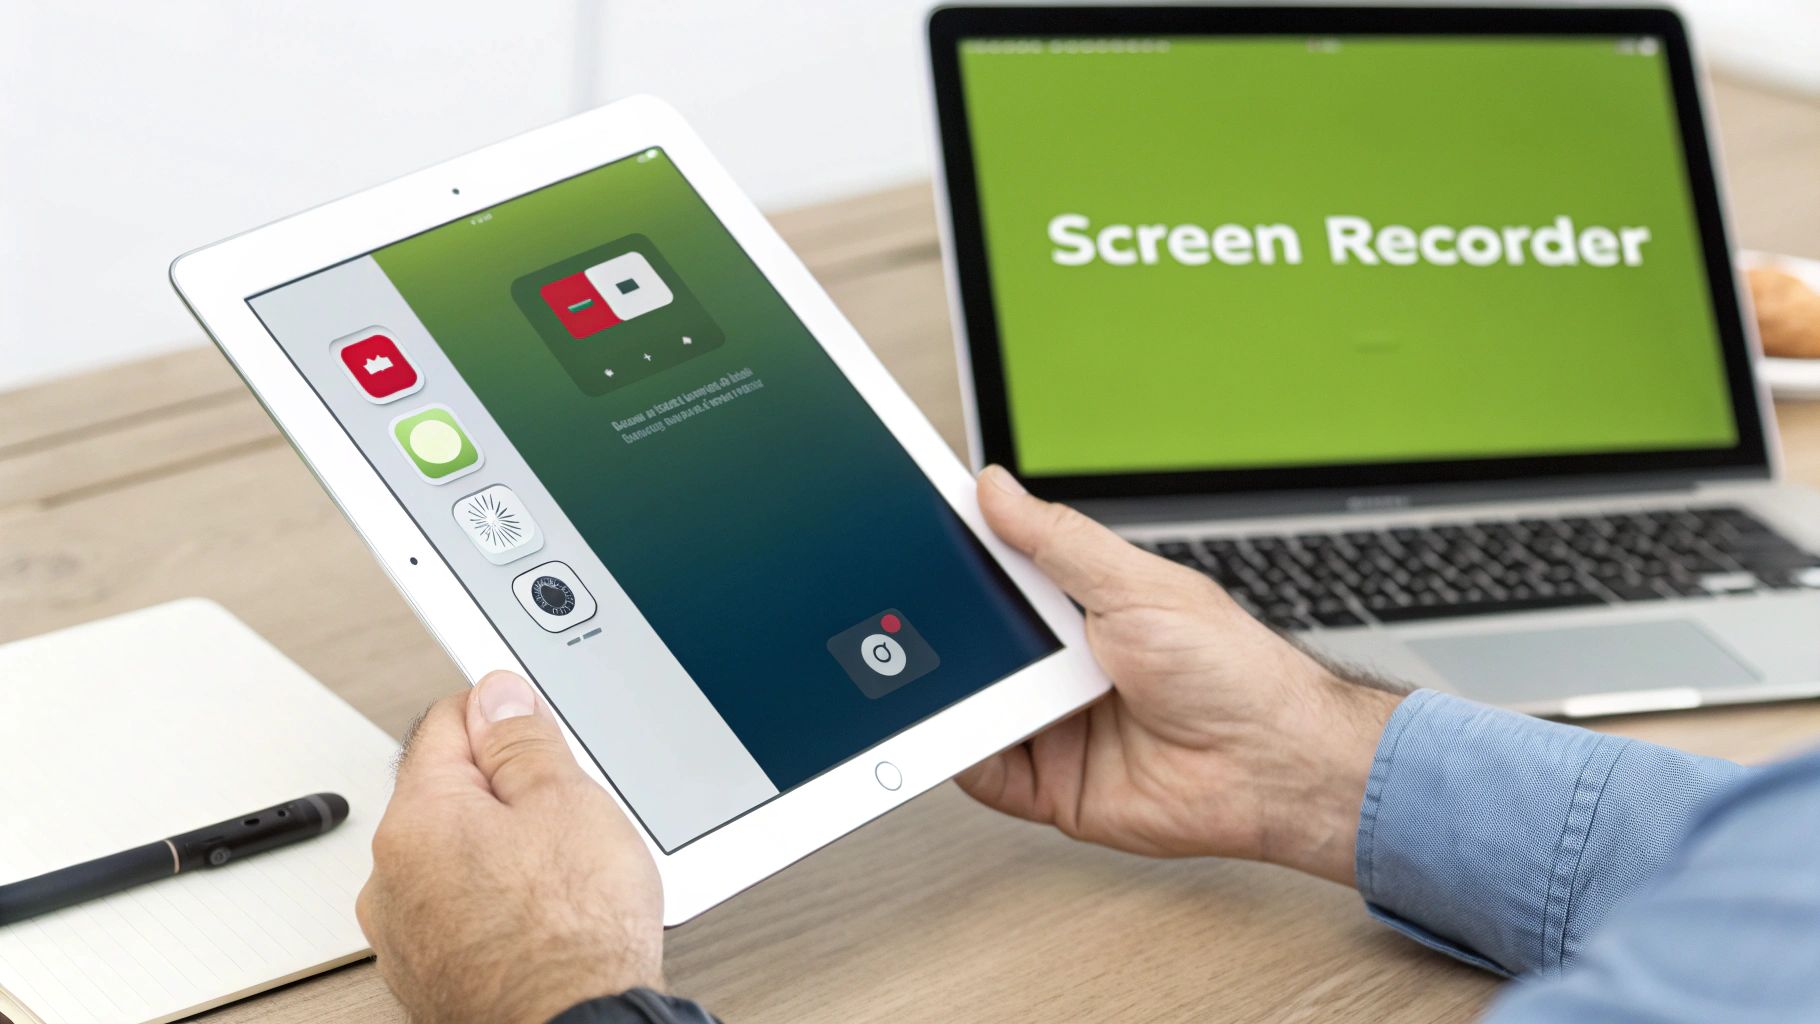
Think of it as your go-to digital whiteboard. It’s fast, effective, and always there when you need it. The trick is knowing how to get to it quickly and use its most powerful (and often overlooked) features.
Setting Up Your Control Centre
First things first. Before you can record with a single swipe, you need to add the Screen Recording button to your iPad's Control Centre. Don't worry, this is a one-time setup that will make your life much easier down the road.
Here’s how you do it:
Open the Settings app on your iPad.
Tap on Control Centre in the left-hand menu.
Scroll down to the "More Controls" list and find Screen Recording.
Tap the green plus icon (+) next to it. That's it!
Now, when you swipe down from the top-right corner of your screen, you'll see a new icon: a circle inside a ring. That’s your record button, ready and waiting.
Adding Your Voice to the Recording
Here’s a tip that many people miss, and it’s a real game-changer for tutorials: you can record your voice at the same time. Instead of just showing what’s on screen, you can actually explain it, adding context and a personal touch to your lessons.
To turn on your microphone:
Swipe down to open the Control Centre.
Press and hold the Screen Recording icon (don't just tap it).
A new menu pops up. At the bottom, you’ll see a Microphone icon. Tap it to turn it on—it will turn red.
Now, just tap Start Recording, and your iPad will capture your voice along with the screen.
Real-World Scenario: Imagine a university lecturer needs to show students how to use a specific research database. Instead of a long-winded email, they can record a quick two-minute video. With the mic on, they can explain each step, point out search filters, and offer tips as they go. That video can be uploaded directly to their Canvas course for students to watch whenever they need it.
Starting and Stopping Your Recording
Once you're set up, the actual recording part is dead simple.
When you're ready to go, swipe down to open the Control Centre and tap the Screen Recording button. You’ll get a three-second countdown, giving you just enough time to close the menu and get to the app you want to show.
You'll know you're recording because a red icon or bar will appear at the top of your screen. It’s a handy reminder that you're "live."
Finished your demonstration? Stopping is just as easy. You can either:
Tap the red status bar at the top and confirm by tapping "Stop."
Or, swipe down to the Control Centre again and tap the flashing Screen Recording button.
Your video is then automatically saved right into your Photos app, ready for the next step.
Trimming and Preparing Your Video
Let’s be honest, not every take is perfect. You might have a few seconds of fumbling at the start or an awkward pause at the end. The good news is you can trim this out directly in the Photos app, no fancy editing software required.
To clean up your video:
Open the Photos app and tap on your recording.
Tap Edit in the top-right corner.
A timeline of your video will appear at the bottom. Just drag the yellow handles at each end to trim off the parts you don't need.
When you're done, tap Done and choose "Save Video" or "Save Video as New Clip."
After a quick trim, your video is ready to share. You can upload it straight to your LMS, whether that’s Moodle or Blackboard, or send it to a dedicated platform like MEDIAL for more advanced features like captioning. This built-in method is a surprisingly powerful way to start creating great instructional content right away.
Filming Your iPad with an External Camera
Sometimes, the built-in screen recorder just doesn't cut it. When you need to show your students exactly how you're holding a stylus, making a specific swiping gesture, or even using a physical object alongside your iPad, you'll need to film it with an external camera. This approach brings a real, human element to your videos that a simple screen capture could never replicate.
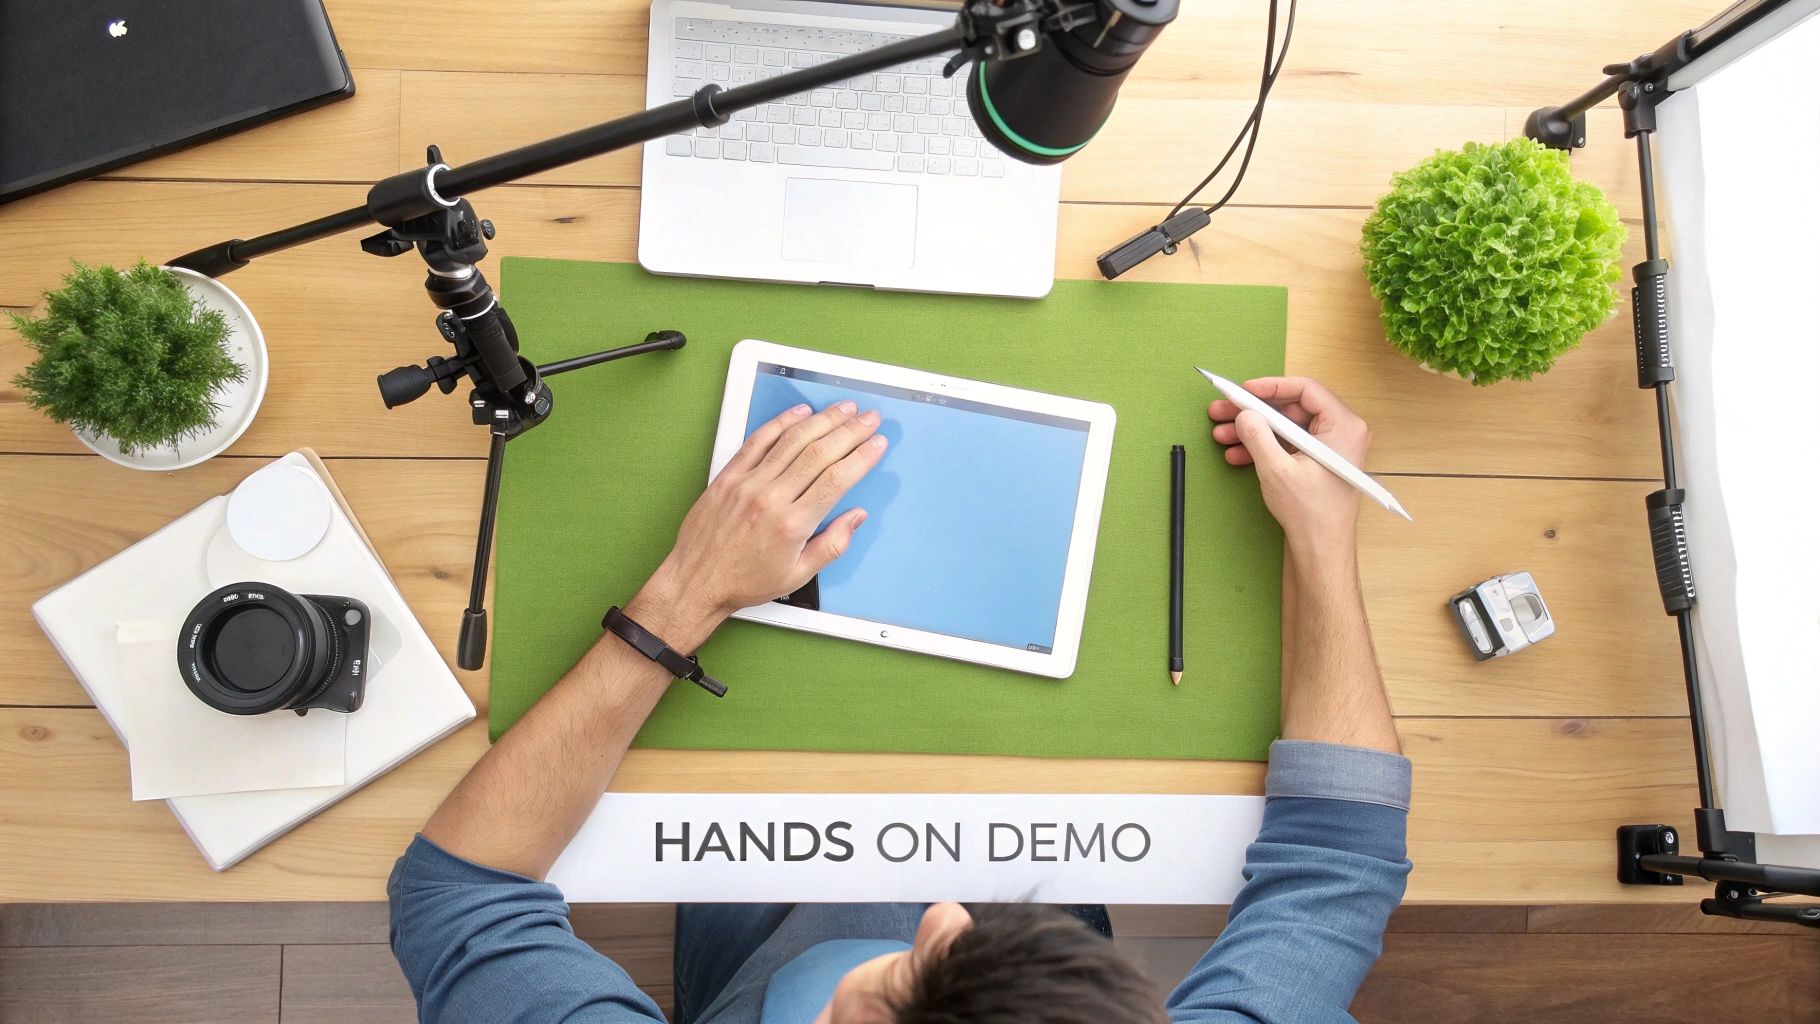
This kind of setup is gold for art teachers demonstrating brush strokes in Procreate, science instructors showing how an app interacts with a real-world experiment, or really anyone who needs to bridge that gap between digital instructions and physical actions. The main hurdle, though, is getting a stable, clear shot without battling that dreaded screen glare.
Choosing the Right Mount for a Stable Shot
First things first, you need to get your camera locked into a fixed position. A wobbly, handheld video is an instant distraction and looks unprofessional, so a good mount is non-negotiable. The goal is to get your camera—whether it’s your phone or a proper DSLR—held steady and pointing straight down at your iPad.
Here are a few practical options that work well:
Desk Clamp Mounts: These are often the most affordable and flexible choice. They clamp right onto the edge of your desk and have a long, posable arm. My tip? Look for one with a ball head, as it makes fine-tuning the camera angle an absolute breeze.
Overhead Tripods: If you’re after a more professional and rock-solid setup, an overhead tripod is a fantastic investment. It stands on the floor with a horizontal arm that reaches over your desk, giving you that perfect top-down view without tripod legs getting in your way.
DIY Rigs: Don’t knock a creative solution! In a pinch, you can just balance a regular tripod across two sturdy stacks of books to create an overhead bridge. It’s not pretty, but it absolutely works for a quick recording session.
Real-World Scenario: Imagine a primary school teacher recording a short video on how to form letters in a handwriting app. By using a simple desk clamp mount with their smartphone, they get the perfect top-down view. This allows the children to see exactly how the teacher holds the Apple Pencil and forms each stroke—a crucial detail that a standard screen recording would completely miss.
Conquering Screen Glare with Smart Lighting
Once your camera is stable, the next beast to tackle is screen glare. The reflection of your ceiling lights or a bright window can render your video useless. The secret isn't more light, but smarter light.
What you're aiming for is diffused, indirect lighting. Instead of a harsh spotlight from directly above, you want soft light hitting your workspace from the sides. This illuminates your hands and the iPad screen without turning it into a mirror.
Here are a few simple lighting tricks I've picked up:
Use Two Light Sources: Position two small lamps at roughly a 45-degree angle on either side of your iPad, just out of the camera's shot. This cross-lighting technique is brilliant for cancelling out harsh shadows and reflections.
Diffuse Your Lights: You don't need expensive gear for this. If your lamps are too bright, try bouncing the light off a white wall or ceiling. You can even tape a sheet of baking paper over a desk lamp to create a surprisingly effective, cheap diffuser.
Kill the Overhead Lights: The main ceiling light is almost always the worst culprit for glare. Turn it off and rely on your side lights instead.
Manage Natural Light: Try to set up your desk so that windows aren't directly in front of or behind you. Light coming from the side is much easier to control.
By taking a bit of time to position your mount and control your lighting, you can create genuinely high-quality, engaging videos. This method adds a layer of detail and personality that will make your instructional content far more effective for your students.
Mirroring Your iPad to a Computer for Better Quality
While the built-in recorder is fantastic for quick jobs and filming with a camera captures your hand movements, there's another level of quality you can unlock. Mirroring your iPad's screen directly to a Mac or PC is the secret to creating crisp, professional-looking instructional videos.
This method gives you a much more polished final product. By sending your iPad's display straight to your computer, you sidestep the limitations of the internal recorder and avoid the dodgy quality that comes from filming a screen with a camera. It opens up a world of possibilities, letting you record in higher resolutions and, most importantly, use a much better microphone.
Recording on a Mac with QuickTime Player
If you're on a Mac, you're in luck. The best tool for this job is probably already on your computer, and it's completely free. I'm talking about QuickTime Player, which is far more than just a simple video player—it has a powerful recording feature that works perfectly with your iPad.
The setup is refreshingly simple. All you need is the standard USB-C or Lightning cable that your iPad came with.
Plug your iPad into your Mac with the cable.
Open QuickTime Player (it’s in your Applications folder).
Go to the menu bar at the top and click File, then select New Movie Recording.
A new window will pop up, probably showing your webcam at first. Look for the small dropdown arrow next to the red record button and give it a click.
Under the "Camera" section, just select your iPad's name. Your iPad screen will instantly pop up in the QuickTime window on your Mac.
From that same little dropdown menu, you can also pick your audio source. This is where the real magic happens for quality. Instead of relying on the iPad's tiny built-in mic, you can now select your Mac's microphone or, for the best possible sound, a proper USB microphone.
A Trainer's Workflow: Picture a corporate trainer creating a detailed software demo for their company's D2L Brightspace setup. By mirroring their iPad to their Mac, they can record the app interface in perfect clarity while using a Blue Yeti USB mic for their voiceover. The result is a tutorial that is easy to watch and, crucially, easy to hear.
Options for Windows PC Users
For those of us on a Windows PC, the process needs a bit of help from a third-party app, but the results are just as impressive. These apps essentially turn your PC into an AirPlay receiver, letting your iPad cast its screen over, either wirelessly or via a USB cable.
Two of the most reliable and popular tools for this are Reflector and AirServer. Both are paid apps, but they offer free trials so you can have a play around and see which one you prefer. They create a wireless bridge between your iPad and PC.
The general setup is pretty similar for both:
Install the software on your Windows PC.
Make sure your iPad and PC are connected to the same Wi-Fi network.
On your iPad, open the Control Centre and tap the Screen Mirroring icon (it looks like two overlapping rectangles).
Your computer's name should appear in the list—just tap it.
Your iPad screen will now be mirrored to your PC, ready for you to record using software like OBS Studio or Camtasia. This setup also means you can plug a dedicated USB microphone into your PC for brilliant audio. If you want to dive deeper into these kinds of multi-device setups, our guide on how to setup live streaming for educators covers a lot of similar ground.
Key Benefits of Mirroring Your Screen
Choosing to mirror your iPad screen might seem like a few extra steps, but the payoff is huge, especially for educational content. The improvement in quality is something you'll notice straight away.
You get the ability to record in full HD (1080p) or even higher, making sure every tiny detail and bit of text on your screen is perfectly clear. Plus, with most recording software, it's dead simple to add a picture-in-picture feed from your webcam, letting you connect with your audience on a more personal level.
This combination—a crisp screen capture, clear audio narration, and your face in the corner—is what elevates a simple tutorial into a professional-grade instructional video.
Going Pro with an HDMI Capture Card
Sometimes, good enough just isn't. For those moments when you need absolutely pristine, broadcast-quality video—think high-stakes presentations, professional training modules, or a live-streamed guest lecture—a direct hardware connection is the only way to go.
This setup delivers a flawless video feed with zero lag or the compression artefacts you sometimes get with wireless methods.
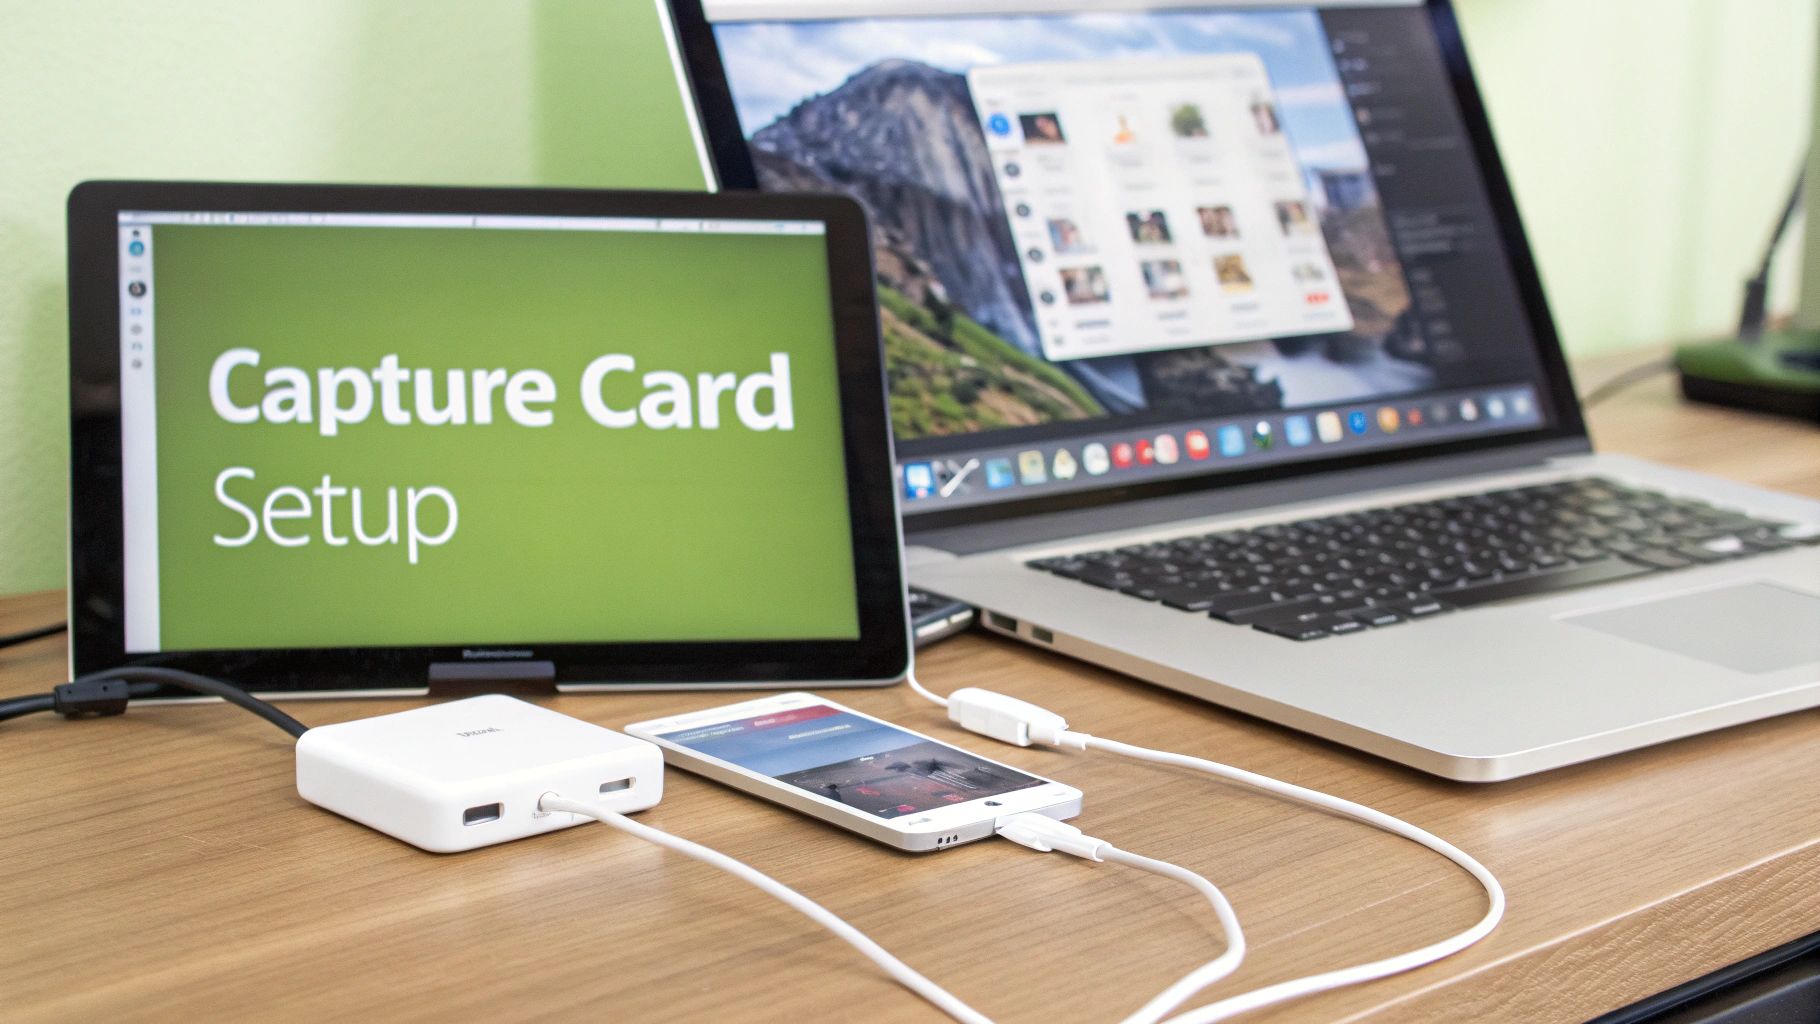
The idea is to send the video signal straight from your iPad into your computer using an external capture card. It might sound a bit technical, but it's surprisingly straightforward. Honestly, it’s the gold standard for educators who need every single pixel to be perfect.
Your Hardware Checklist
To get started, you’ll need a few key bits of hardware. This isn't about buying the most expensive gear on the market, but about getting the right components to create a stable, high-fidelity connection.
Here’s exactly what you'll need to pull this off:
An iPad with a USB-C or Lightning port: This is your video source.
A digital AV adapter: For iPads with a Lightning port, you'll need Apple's Lightning Digital AV Adapter. If you have a newer iPad with USB-C, a simple USB-C to HDMI adapter will do the trick.
An HDMI cable: No need for anything fancy; a standard, reliable HDMI cable is all you need.
An external capture card: This is the heart of the operation. Popular, dependable options like the Elgato Cam Link 4K or the AVerMedia Live Gamer Mini are brilliant. These little devices act as a bridge, converting the HDMI signal into something your computer recognises as a webcam.
A computer (Mac or PC): This is where you'll run the recording software and handle the final video.
Putting these pieces together ensures a pure, uncompressed video feed from your iPad. It completely eliminates any risk of Wi-Fi dropouts or the blocky visuals that can occasionally plague screen mirroring.
Getting Everything Connected
Once you've got all your gear, connecting it is just a logical sequence. Think of it as creating a direct pipeline for your video to travel from the iPad's screen right into your recording software.
Plug the Digital AV Adapter into your iPad.
Connect one end of the HDMI cable to the adapter.
Plug the other end of the HDMI cable into the input port on your capture card.
Finally, plug the capture card into a USB port on your computer.
That's it. Your computer should automatically recognise the capture card as a new video source, just as if you’d plugged in a new webcam. The plug-and-play nature of modern capture devices makes this whole process a breeze.
Why This Matters for Detail-Oriented Content: Imagine a medical school professor demonstrating a complex anatomical model in a 3D app. The incredible detail and fluid motion are crucial for learning. A direct HDMI connection ensures that every subtle rotation and texture is captured in perfect, lag-free clarity for students watching live or on-demand.
Firing Up Your Recording Software
With everything hooked up, the last step is to tell your computer what to do with this new video feed. For this, I can't recommend OBS Studio (Open Broadcaster Software) enough. It's free, incredibly powerful, and works on both Mac and PC, giving you complete control over your recording.
Inside OBS, you'll want to set up a new "scene".
First, add a Video Capture Device source. In the properties window that pops up, select your capture card (e.g., "Cam Link 4K") from the device list. Your iPad screen should instantly appear in the preview window.
Next, add an Audio Input Capture source. This is where you'll select your microphone—a good USB mic plugged into your computer is ideal for getting that crisp, clear narration.
From here, OBS lets you add other elements like a picture-in-picture view from your webcam, text overlays, or your school's branding. Once you’re happy with the layout, just hit "Start Recording." Your high-quality instructional video will be saved directly to your computer, ready for you to edit and share.
Editing and Sharing Your Educational Videos
Hitting the stop record button is a great feeling, but your work isn't quite finished yet. The raw footage you've captured is really just the starting point. Now comes the post-production magic, where you transform that good recording into a brilliant educational resource that’s clear, accessible, and ready for your students.
This final phase is all about trimming the unnecessary fluff, adding helpful visual aids, and making sure your video plays perfectly inside your specific Learning Management System (LMS). Let’s walk through the essential steps to polish and share your content like a pro.
Essential Editing for Clarity and Impact
You don’t need to be a Hollywood director to make meaningful edits. The goal here is clarity, not complexity. I've found that simple, purposeful adjustments can make a world of difference to the learning experience.
Start with the absolute basics. The single most impactful edit you can make is just trimming the start and end of your video. Get rid of the awkward fumbling as you begin and end the recording. Beyond that, a few simple enhancements will take it to the next level:
Cut out dead air: Long pauses while you’re thinking or navigating can kill the momentum. Snipping these out tightens up the pacing and keeps students engaged. For example, if you spend 10 seconds finding a file, cut it out so the video jumps straight to the correct file.
Add text overlays: Use simple text to highlight key terms, definitions, or instructions on the screen. It's a fantastic way to reinforce learning and help viewers follow along.
Insert simple transitions: If you've pieced together multiple recordings, a basic cross-dissolve between clips is much smoother and less jarring than an abrupt jump cut.
Once your iPad screen recording is ready, mastering some essential video editing tips for beginners can help you refine your footage into a truly polished final product. These small changes can significantly boost the professional feel of your work.
Optimising Your Video for Your LMS
Every LMS, whether it's Moodle, Canvas, Blackboard, or D2L Brightspace, has its own quirks when it comes to video. Exporting your video with the right settings is crucial for ensuring every student has a smooth, buffer-free viewing experience, regardless of their device or internet speed.
For maximum compatibility, the MP4 file format using the H.264 video codec is the undisputed champion. It offers an excellent balance between high quality and manageable file size, which is vital for quick loading times.
When you're ready to export, stick to these general guidelines for excellent results:
Resolution: 1080p (1920x1080) is the modern standard for crisp, clear video.
Frame Rate: 30 frames per second (fps) is perfect for this kind of screen recording.
Bitrate: Aim for a variable bitrate around 5-8 Mbps for a good quality-to-size ratio.
Following these settings creates a video file that is universally accepted and will play smoothly for your learners on anything from a laptop to a smartphone. For a deeper dive, you can explore our guide on video editing with MEDIAL, which covers more advanced workflows.
Prioritising Accessibility with Captions
Making your content accessible isn't just a box-ticking exercise; it's an essential part of inclusive education. Closed captions are a lifeline for students who are deaf or hard of hearing, but they also benefit English language learners and even those just studying in a noisy library. In fact, research shows that a staggering 80% of viewers who use captions are not deaf or hard of hearing.
Thankfully, adding captions is easier than ever. Many modern video platforms, including MEDIAL, have brilliant AI-powered tools that automatically generate a transcript for your video.
While these auto-captioning tools are incredibly accurate, it’s always wise to give the results a quick proofread. AI can sometimes misinterpret technical jargon, names, or specific academic terms. A quick human review ensures complete accuracy for your students.
Securely Embedding for a Seamless Experience
Finally, how you share your video really matters. Just uploading a massive video file directly into your LMS can slow your course page to a crawl and create a clunky experience for students. The best approach by far is to upload your video to a dedicated hosting platform and then embed it into your course.
Embedding the video means it streams directly from the host (like MEDIAL) but appears seamlessly right inside your Moodle or Canvas page. This method not only provides a much better viewing experience but also gives you valuable analytics on who is watching your content and keeps your intellectual property secure within a protected environment.
Frequently Asked Questions
When you start filming your iPad screen for the first time, you'll inevitably run into a few common hurdles. I've seen them trip up plenty of educators and trainers. Getting these sorted from the get-go will save you a ton of headaches and help you produce much cleaner, more professional videos for your students.
Let's walk through some of the most common questions I hear.
Can I Record My Voice at the Same Time?
Yes, you can, and for tutorials, you absolutely should! It's actually quite simple.
If you're using the iPad's built-in screen recorder, just do a long-press on the record button in your Control Centre. A little menu will pop up, and you'll see a Microphone icon. Tap that to turn it on before you hit record. It’s that easy.
If you’ve gone the route of mirroring your iPad to a computer, your recording software (like QuickTime or OBS) gives you even more control. You'll be able to select a specific audio source. This is a massive advantage because you can choose your computer’s built-in mic or, for a huge leap in quality, a dedicated USB microphone.
How Do I Stop Notifications Appearing?
Nothing tanks a perfect take faster than a personal message popping up for all to see. The easiest way to block this is to use a Focus mode or the classic Do Not Disturb setting before you even think about recording.
Head over to Settings > Focus. From there, you can create a custom "Recording" profile that silences notifications from every single app and call. This little bit of prep work ensures your final video is distraction-free and keeps your personal life private.
A clean recording is a professional one. Taking five seconds to enable a Focus mode is one of the simplest yet most effective steps you can take. It shows you respect your audience's time by giving them a polished, focused video.
What Is the Best Video Format for an LMS?
For maximum compatibility across pretty much any Learning Management System out there, MP4 (with the H.264 codec) is the undisputed king. It’s your safest bet, hands down.
This format strikes the perfect balance between high video quality and a sensible file size. Your videos will load quickly and play smoothly for students, no matter what device they're on or which LMS your institution uses – whether it's Canvas, Moodle, or Blackboard. Exporting to MP4 just ensures a reliable, consistent experience for everyone.
At MEDIAL, we provide a secure, AI-powered video platform that integrates seamlessly with your LMS to make creating and sharing educational content simple and effective. Discover how our tools can help you manage, edit, and securely stream your videos by exploring our solutions at https://medial.com.
Comments