Encode a Video for eLearning: A Practical Guide for LMS Users
- MEDIAL

- Feb 9
- 12 min read
So, what does it actually mean to encode a video? Think of it as preparing a meal. You take raw ingredients (your huge, unedited video file from a camera or Zoom) and process them into a final dish (a smaller, universally playable MP4 file) that anyone can enjoy on any device. It’s a compression process that makes the file smaller and more universal, ensuring it streams smoothly without turning into a pixelated mess.
For anyone creating educational content, getting this right is non-negotiable. It’s the key to making your videos accessible and engaging for every single learner, no matter if they're on a high-speed campus network or tethering from their phone.
Why Encoding Your Video Correctly Is a Game Changer
Let’s be honest—nothing kills a lesson faster than a video that just sits there buffering or flat-out refuses to play. In the world of online learning, these aren't just minor tech hiccups; they're genuine barriers to education. When a student is stuck wrestling with a massive video file on a shaky home Wi-Fi connection, their focus shifts from learning to frustration.
This is where smart video encoding comes in. It’s not just technical jargon; it’s the solution to these very real problems. By making a few deliberate choices before you even upload, you can create a smooth, inclusive experience for everyone.
The Impact on Student Experience
Good encoding has a direct, positive impact on learning outcomes. It all comes down to a few key areas:
Accessibility: Actionable insight: A one-hour lecture recorded in high quality might be 2 GB. Properly encoded to 720p, it can be reduced to around 500 MB, making it downloadable for a student on a limited mobile data plan. Optimised files mean students with dodgy internet can access course materials just as easily as those plugged into a high-speed campus network.
Engagement: When videos just work, students can focus on the actual content, not a spinning loading wheel. If you've ever dealt with this headache, we've broken down some common causes for why videos are slow in your LMS and how to fix it.
Reduced Costs: This one’s for the institution. Efficiently compressed videos slash your storage and bandwidth bills, freeing up resources that can be better spent elsewhere.
The recent shift to hybrid learning models has really brought this into focus. As UK schools and universities adapted, encoding became the go-to solution for shrinking high-definition lecture recordings into files that platforms like Moodle and Canvas could handle gracefully. Some modern standards, like HEVC, can reduce file sizes by up to 70% without a noticeable drop in quality.
Practical Example: An uncompressed 10-minute 1080p video can easily top 1GB. After encoding with the H.264 codec, that same video can be just 150MB, a file size that's much friendlier for streaming and storage.
To see how these principles play out in a real-world educational setting, it's well worth checking out this digital media case study.
Getting Your Video Settings Right for Maximum Compatibility
Feeling lost in a sea of codecs, containers, and bitrates? You're not alone. The good news is you don't need to be a film industry expert to get this right. Think of it like making a sandwich: you just need to get the three core components working together.
First, you have the codec, which is like the recipe for how your video and audio are compressed. Next up is the container—the lunchbox (like .MP4 or .MOV) that holds everything together. Finally, the bitrate is the portion size, dictating how much data you pack into each second of video. This last one is a constant tug-of-war between quality and file size.
Nailing these three elements is the secret to making sure your video plays flawlessly for every student, no matter what device or internet speed they’re working with.
Your Go-To Codec and Container
For the world of eLearning, especially inside an LMS like Moodle or Canvas, there's a clear winner: the H.264 (AVC) codec packed inside an MP4 container.
This combo is the undisputed champion of universal playback. Just about every modern browser, smartphone, and computer can handle this format natively, without asking students to download special plugins or software. It just works.
Sure, there are newer codecs like H.265 (HEVC) that offer better compression, particularly for 4K content, but they aren't nearly as well-supported on older devices. Sticking with H.264 is the safest bet for educational content where you can't control what hardware your viewers are using. If you want to dive a bit deeper into how these digital translators work, you can learn more about codecs in our detailed guide.
As for the container, MP4 is simply the most versatile and widely accepted "lunchbox" for your H.264 video. It reliably holds your video, audio, and even subtitles in one neat, universally-accepted package.
Finding the Sweet Spot for Bitrate and Resolution
This is where the real balancing act comes into play. A higher bitrate gives you beautiful, crisp quality, but it also creates a massive file that can lead to endless buffering for students on slower connections. Go too low, and your video might look like a pixelated mess.
So, instead of guessing, it's best to start with some proven presets that work for most eLearning scenarios. Here's a quick reference table to get you started.
Recommended Encoding Presets for eLearning Content
This table provides a quick-reference guide to the ideal encoding settings for common educational video types. Following these presets will help ensure optimal quality and compatibility in any LMS.
Video Type | Resolution | Codec | Bitrate (VBR) | Frame Rate (FPS) | Best For |
|---|---|---|---|---|---|
Lecture Recording | 1080p (1920x1080) | H.264 (Video) AAC (Audio) | 2,500 - 4,000 kbps (Video) 128 kbps (Audio) | 25 or 30 | Talking head presentations, clear on-screen text, high-quality delivery. |
Screencast/Demo | 1080p (1920x1080) | H.264 (Video) AAC (Audio) | 2,000 - 3,500 kbps (Video) 128 kbps (Audio) | 25 or 30 | Software tutorials, detailed screen captures, sharp visual clarity. |
Mobile & Low Bandwidth | 720p (1280x720) | H.264 (Video) AAC (Audio) | 1,500 - 2,500 kbps (Video) 128 kbps (Audio) | 25 or 30 | Ensuring accessibility for all students, regardless of device or connection speed. |
Simple Animation | 1080p (1920x1080) | H.264 (Video) AAC (Audio) | 3,000 - 5,000 kbps (Video) 128 kbps (Audio) | 25 or 30 | Explainer videos with motion graphics and fast transitions. |
Using these presets as your starting point takes the guesswork out of encoding and puts you on the path to creating videos that are both high-quality and accessible for your entire audience.
Actionable Insight: Always use Variable Bitrate (VBR) encoding instead of Constant Bitrate (CBR). VBR is much smarter—it allocates more data to complex, fast-moving scenes (like a science experiment) and less to static shots (like a PowerPoint slide). The result is an optimised file size without sacrificing quality where it really counts.
A Practical Workflow for Encoding with FFmpeg
Right, let's get our hands dirty and actually encode a video. For this, we'll be using FFmpeg, a seriously powerful (and free) command-line tool that can handle pretty much any video task you can imagine. I know, command-line tools can look a bit scary at first, but once you have the right commands, the process is surprisingly simple.
This diagram breaks down the three core components we're about to control: the codec, the container, and the bitrate.
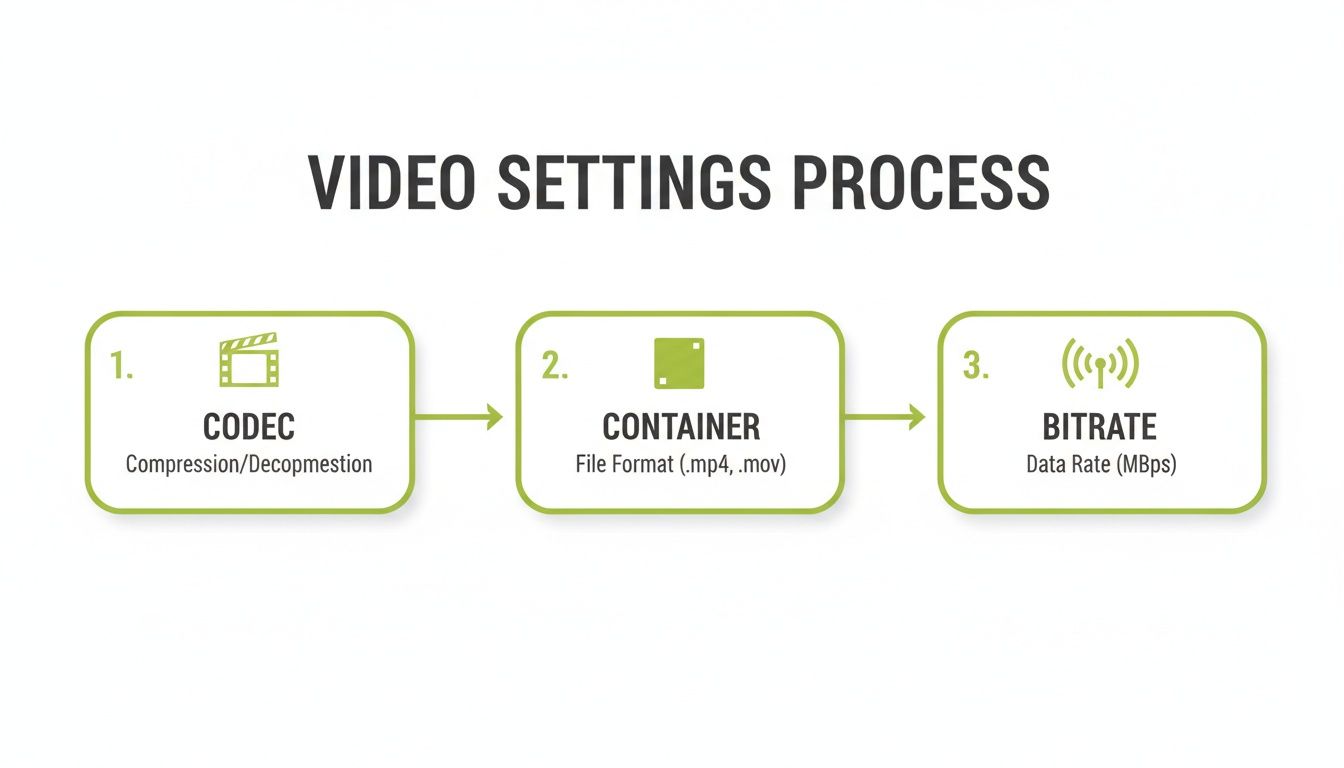
Getting your head around how these three elements work together is the real key to creating video files that look great and play nicely everywhere.
Your First FFmpeg Command
Let's kick things off with a simple command you can just copy and paste. This will take a single video file (we'll call it for this example) and convert it into our recommended MP4/H.264 format, which is perfect for just about any LMS.
First, you'll need to open your terminal (on macOS) or command prompt (on Windows) and navigate to the folder where your source video is saved. Once you're there, run this command:
Practical Breakdown:
: Specifies your input file.
: Sets the video codec to H.264 (the universal standard).
: This controls the quality. Lower numbers mean higher quality and bigger files. 23 is a great balance.
: Sets the audio codec to AAC at a bitrate of 128kbps, perfect for clear voice narration.
: Names your final, encoded file.
If you're keen to really get into the nitty-gritty of file sizes, we've got some great tips on how to reduce video file size without losing quality.
Burning Subtitles for Accessibility
Making sure your videos are accessible to everyone is non-negotiable. An easy way to guarantee subtitles are always visible is to "burn" them directly into the video frames. This makes them a permanent part of the picture itself, meaning they’ll show up on any device without needing any special plugins or settings.
Let's imagine you have your subtitles in a file named . You can add them to your video by tweaking the previous command just a little:
The bit is where the magic happens. It instructs FFmpeg to apply a video filter () that overlays the text from your SRT file onto the video. With one simple addition, your content becomes instantly more inclusive.
The Real Game Changer: Batch Encoding
Encoding videos one by one is fine when you've only got a single lecture to process. But what about an entire semester's worth of recordings? That’s where batch scripting becomes an absolute lifesaver. You can create a simple script that automatically encodes every single video in a folder.
Think about it: drop all your raw recordings into one folder, run a single command, and come back later to find them all perfectly encoded and ready for your LMS. When dealing with branded content, you can even integrate a logo api into more advanced scripts to automatically add watermarks.
Here’s how to set this up for Windows and macOS.
Windows Batch Script (.bat file)
In the folder containing your videos, create a new text file. Paste the following code into it, and then save the file as .
@echo off
for %%f in (*.mov, *.avi, *.mkv) do (
    ffmpeg -i "%%f" -c:v libx264 -preset medium -crf 23 -c:a aac -b:a 128k "encoded_%%~nf.mp4"
)
echo All videos encoded!
pause
Now, just double-click that file. It will automatically find every , , or file in that folder and create a new, properly encoded version with "encoded_" added to the start of the filename. Simple as that.
This kind of workflow transforms a complex, time-consuming chore into a completely manageable process for busy instructors and IT staff. We're talking about saving countless hours over the course of a term.
Streamlining Your Workflow Inside the MEDIAL Platform
While command-line tools like FFmpeg offer incredible power, let's be realistic—they aren’t always the most efficient choice for a busy educator. Sometimes, you just need a quick, integrated way to encode a video without ever leaving your web browser. This is precisely where the MEDIAL platform comes in, turning what used to be complex technical tasks into simple, click-based actions.
Picture this: you've just wrapped up a ninety-minute Zoom lecture. It's packed with great information, but the first five minutes are just casual chat, and the last three are spent saying goodbye. Instead of downloading a massive file and wrestling with command-line tools, you can sort this out directly within MEDIAL.
Quick Edits and Exports in Your Browser
The platform's built-in editor was designed for this exact scenario. You can pull up your uploaded Zoom recording and simply drag the handles on a timeline to trim off the unwanted start and end sections. There’s no complicated software to install or a single command to memorise.
Once you’ve made your cuts, you just select ‘Export as new clip’. MEDIAL takes it from there, automatically performing a few key tasks behind the scenes:
Re-encoding: It creates a brand-new, clean video file based only on your trimmed selection.
Optimisation: The new clip is encoded using the ideal settings (MP4/H.264) for perfect playback in your LMS.
Storage Management: The original, lengthy recording remains untouched, giving you a polished, concise version for your students.
This whole process turns a multi-step, technical workflow into a simple, two-minute job performed entirely within your course environment.
The real advantage here is immediacy. You can record a lecture, trim it, add captions, and embed it into your LMS in a single, unbroken workflow. It’s a massive time-saver.
Effortless Accessibility with AI Captioning
Accessibility is another area where having an integrated platform makes a huge difference. MEDIAL includes an AI-powered service that automatically generates captions for your videos. This is more than just a convenience; it’s a straightforward way to ensure your content meets accessibility standards without the grind of manual transcription.
When you use the built-in editor to export that trimmed clip, the platform is smart enough to handle the captions, too. It automatically re-syncs the existing subtitles to match your newly edited, shorter video. The resulting SRT or VTT file will be perfectly timed to the new clip, ready to go.
This is a great example of how a modern media platform makes advanced features accessible to everyone, not just the technical experts. It removes the guesswork from encoding a video and handling its related files, letting you get back to what you do best: creating great educational content.
Future-Proofing Your Content with Adaptive Streaming
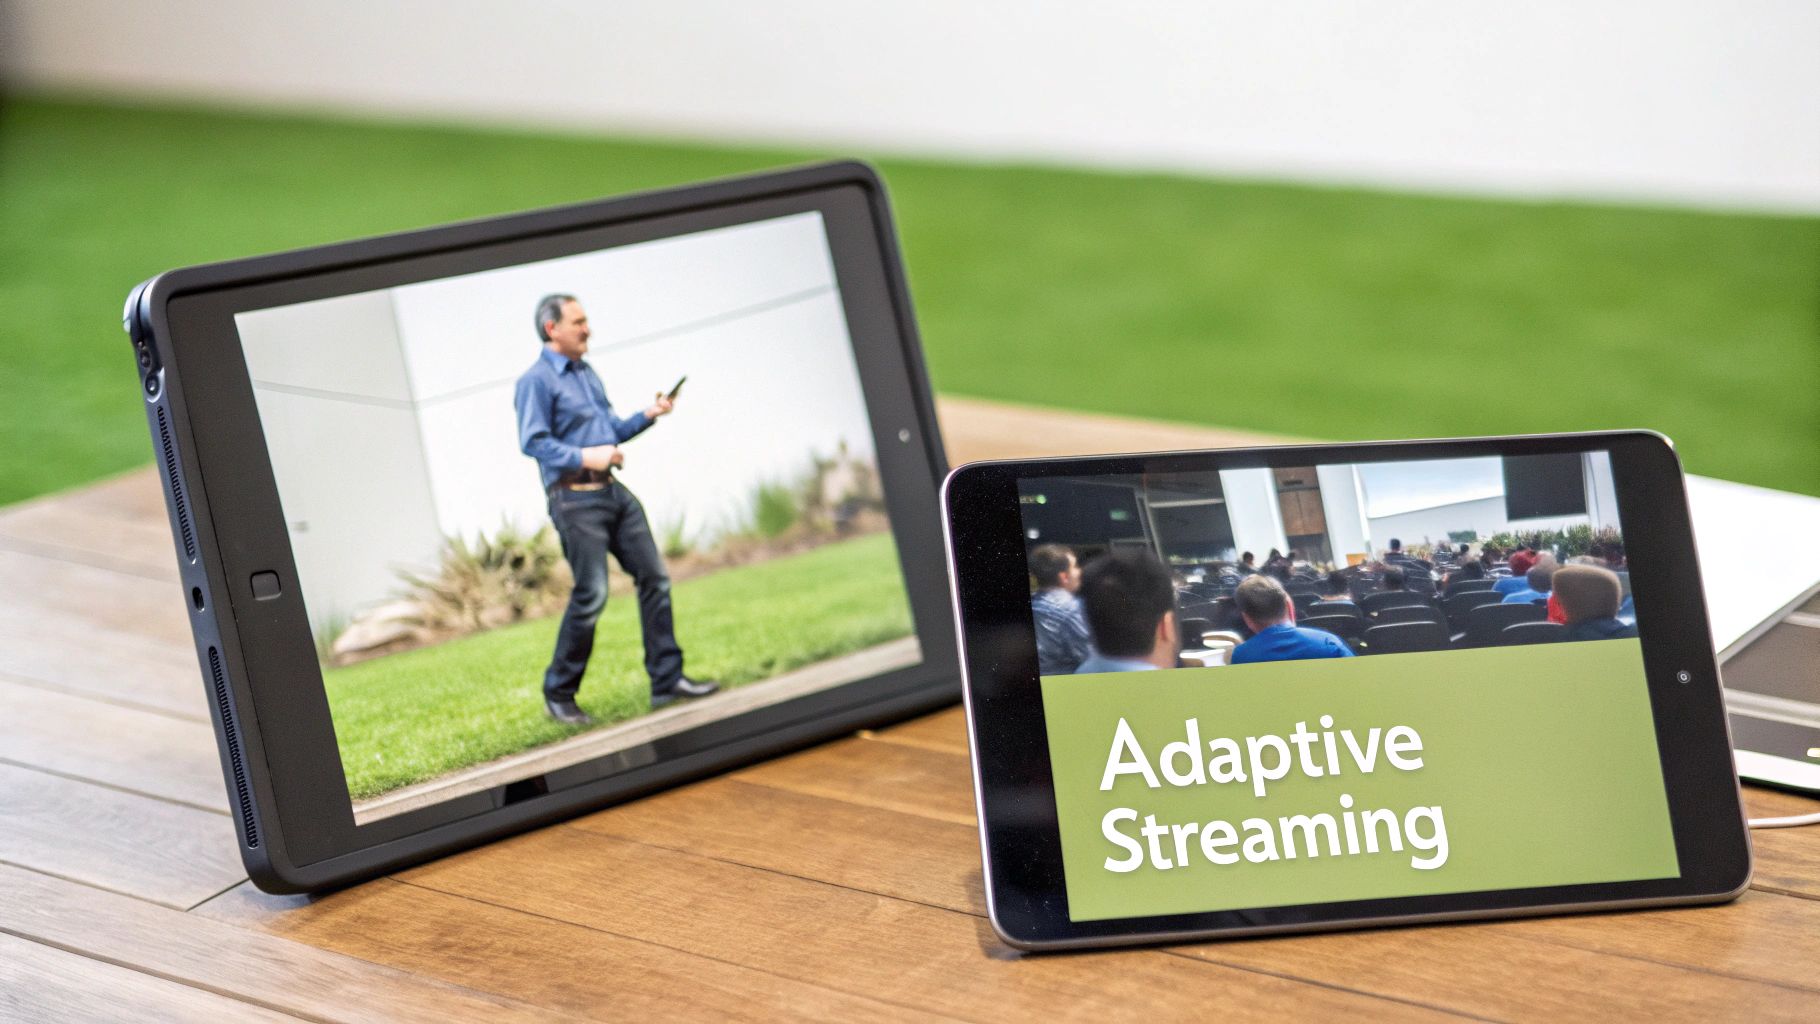
So far, we've walked through how to encode a video into a single, highly compatible file. That’s a huge step forward. But to deliver a genuinely brilliant viewing experience for everyone, we need to talk about adaptive streaming.
Think of your video like a smart car on a motorway. When the road is clear, it can zip along at full speed, giving you a crisp, high-definition picture. But if it hits a patch of traffic—say, a weak Wi-Fi signal—it automatically slows down to a lower-quality stream to avoid grinding to a halt. That’s the basic idea behind adaptive streaming.
How Does It Actually Work?
Instead of relying on a single video file, technologies like HLS (HTTP Live Streaming) and DASH (Dynamic Adaptive Streaming over HTTP) chop your video into multiple versions. Each one is encoded at a different resolution and bitrate.
Practical Example: A single 1080p source video is automatically encoded into several versions:
A crisp 1080p version for high-speed connections.
A standard 720p version for average Wi-Fi.
A 480p version for weaker mobile data connections.
A 240p version to ensure playback even on the poorest networks.
When a student hits play, their device is smart enough to request the best possible version their internet connection can handle at that moment. It can even switch between these versions on the fly as their connection quality changes.
If you're a MEDIAL user, the great news is this all happens automatically. When you upload a video, the platform gets to work creating these different versions for you, completely behind the scenes. This is a game-changer, solving the real-world problem of learners in rural areas or on patchy mobile data, ensuring everyone gets access without staring at that dreaded buffering wheel.
The demand for this kind of delivery has exploded in the UK. Ofcom reports that a massive 78% of UK adults now stream video daily, with educational content accounting for a significant 22% of those views. Properly encoded streams can slash data usage by up to 75% compared to raw video—a critical stat when UK broadband speeds can vary so dramatically between postcodes. For a deeper dive into market trends, Mordor Intelligence has some great data on video encoding.
By embracing adaptive streaming, you're not just encoding a video; you're creating a resilient, future-proof asset that guarantees a smooth playback experience for every single learner, no matter their location or device.
Dealing with Common Encoding Problems
Ever spent ages exporting a video, only to find the audio is drifting out of sync, or the picture looks surprisingly blocky? We’ve all been there. These frustrations can derail a perfectly good piece of content, but thankfully, the fixes are usually straightforward once you know what to look for.
Let's walk through the most common headaches and get them sorted out.
Fixing That Annoying Audio Sync Drift
There's nothing more jarring than audio that starts perfectly but slowly drifts away from the video. By the end of a ten-minute clip, your voice can be a full second ahead of your lip movements. This almost always comes down to a Variable Frame Rate (VFR), something you’ll often find in recordings from smartphones or screen capture tools like Zoom.
VFR is a clever trick to save processing power. It drops frames when there’s not much happening on screen. While efficient, it creates chaos for most video editors and players, which are built to expect a Constant Frame Rate (CFR). The audio track, running at its own steady pace, has no idea the video is speeding up and slowing down, and that's what causes the dreaded drift.
The best way to fix this for good is to re-encode the video to a constant frame rate before you even start editing. A simple FFmpeg command can rebuild the video's timing without touching the quality.
This little bit of code forces the video to a steady 30 frames per second, locking the audio and video together for good.
Actionable Insight: Run this command on all Zoom or phone recordings before importing them into your editing software (like Camtasia or Premiere Pro). This single pre-processing step can save you hours of frustration trying to manually re-sync audio later.
Why Does My Video Look Blocky or Pixelated?
Another classic complaint is exporting a crisp 1080p video that ends up looking blurry or full of chunky blocks, especially during fast-moving scenes. This isn't usually a problem with the resolution itself; it's an issue with bitrate and keyframes.
Your bitrate is simply the amount of data you're allocating to each second of video. If it's too low, the encoder just doesn't have enough information to draw a clear picture during complex scenes, which leads to that blocky, pixelated look.
Here’s how you can troubleshoot it:
Bump Up the Bitrate: For a standard 1080p video at 30fps, a bitrate somewhere between 2,500 and 4,000 kbps is a solid bet. If you’re seeing blockiness, try nudging it towards the higher end of that range.
Check Your Keyframe Interval: A keyframe is a full, complete picture in your video stream. All the frames in between just store the changes from that picture. If your keyframe interval is set too high (say, 10 seconds), anyone skipping ahead in the video might see a garbled mess until the next keyframe finally loads. For web video, a keyframe every 2 seconds is a good rule of thumb.
Getting these settings right turns encoding from a frustrating guessing game into a reliable process. You’ll end up with a clean, professional video that’s ready for your audience every time.
Ready to eliminate these encoding headaches for good? MEDIAL streamlines the entire process with in-browser editing, automated optimisation, and AI-powered captioning, all integrated directly into your LMS. Discover a simpler workflow with MEDIAL.
Comments