
OBS Best Settings for Streaming and Recording in 2026

The most repeated OBS advice is also the least useful: set 1080p60, choose 6000 kbps, press Start Streaming, and hope your hardware and broadband agree. That preset can work, but it isn't a universal definition of quality. A seminar recording, a Teams presentation and a Twitch broadcast place very different demands on your encoder, upload connection, storage and audience devices.
UK viewers also watch video across a wide mix of screens and services. Ofcom reported that UK adults spent an average of 4 hours 20 minutes online each day in May 2024, while people watched 4 hours 31 minutes of TV and video content at home per day in 2023. Video-sharing platform viewing rose to 49 minutes per person per day, and 85% of in-home video viewing happened on TV sets. These conditions make stable playback, readable text and clean captions more valuable than chasing maximum frame rate. (Ofcom's Online Nation 2024 report)
I've configured OBS for lectures, webinars, training sessions and live events, and my recommendation is consistent: choose settings for the situation, then validate them on the actual machine and network. The best OBS settings are the ones that keep the picture legible, the voice intelligible and the session stable when the laptop is under pressure.
Why the Default OBS Settings Are Usually Wrong
The 1080p60, 6000 kbps template assumes that the creator has a strong encoder, spare graphics capacity and a consistent upload connection. It also assumes that the content benefits from sixty frames per second. A slide deck, talking head or software demonstration usually doesn't. Running 60 FPS for those formats adds work without automatically making text sharper.
A hybrid worker presenting from a laptop on a shared home connection has a different problem. Teams, browser tabs and screen capture compete for system and network resources. A 1080p60 scene may look excellent in a local preview, then stutter when a meeting, cloud sync or household stream starts using the same connection.
A PhD student recording seminars has no reason to spend the same effort on a live upload. Local recording can use a quality-focused workflow, and the student can prioritise 30 FPS, readable slides and reliable audio. Reusing a streaming bitrate for that capture can constrain the file for no benefit.
A casual Twitch streamer has the opposite concern. The broadcast must arrive at the platform consistently, and the audience may be watching on a phone, laptop or television. A higher frame rate is useful for fast gameplay, but it isn't worth sacrificing stability. If the laptop fan is already loud and the OBS stats show rendering or encoding pressure, reduce output resolution before trying to force a more demanding frame rate.
Practical rule: Resolution describes detail, frame rate describes motion, and bitrate determines how much information you can preserve. Match all three to the content and connection.
The UK market makes this discipline more important. S&P Global reported that 85% of UK homes used at least one subscription video-on-demand service, with households using an average of 2.5 SVOD services and an average of three free online video services. Mixed-device delivery is normal, so a technically ambitious stream that repeatedly buffers is a worse result than a slightly smaller stream that plays cleanly. (S&P Global's 2025 UK digital entertainment update)
Setting | OBS default | Lecture capture | Teams meeting | Casual Twitch stream |
|---|---|---|---|---|
Output resolution | Often left at canvas size | 1080p where the slides remain sharp, otherwise 720p | 720p is usually sufficient for a camera and screen | 1080p if the system and connection remain stable |
Frame rate | Commonly set to 60 FPS by tutorials | 30 FPS | 30 FPS | 60 FPS for fast motion, 30 FPS for talk-led content |
Rate control | CBR for streaming | Quality-focused recording control | CBR when sending a live feed | CBR |
Encoder | Whatever OBS selects | Dedicated recording encoder in Advanced mode | Hardware encoder where available | Hardware encoder where available |
Priority | Maximum visible specifications | Clear text and dependable audio | Stable meeting performance | Stable delivery and responsive gameplay |
Treat that table as a decision framework, not a shortcut. Start with the use case, then lower the workload when the machine or connection can't sustain it.
Choosing the Right Encoder for Your Hardware
Open Settings > Output and switch Output Mode from Simple to Advanced. Simple mode is fine for a first test, but Advanced mode lets you separate streaming and recording encoders, choose independent rate controls, and see which options your hardware exposes.
OBS recommends using the Output tab in Advanced mode for recording. When the recording preset isn't set to “Same as stream”, you can select a separate recording encoder. Hardware encoders such as QuickSync, NVENC and AMD VCE become available when a non-stream-mirroring recording preset is selected. That separation matters for lecture capture because a local file shouldn't inherit unnecessary limits from a live broadcast. (OBS's advanced recording settings guide)
Start with the encoder that leaves headroom
x264 uses the CPU. On a modern eight-core processor, the preset is a sensible starting point for a lecture, webcam scene or screen demonstration. Move to a faster preset if the CPU is struggling. Slower presets can improve compression efficiency, but they aren't useful if the encoder can't finish frames on time.
NVENC uses NVIDIA's hardware encoder and is usually the first choice for a laptop or desktop with an RTX graphics card. Select the quality-oriented option before Max Quality, then test the result. Max Quality can consume more GPU resources, and the visible improvement may not justify the extra load during a game or a complex presentation.
QuickSync is the Intel hardware path available through supported Intel graphics, including systems using Intel Arc or Iris Xe. It is especially useful when the CPU is busy with screen capture, slides, browser content or meeting software.
AMD AMF is the relevant hardware path for supported Radeon graphics and Ryzen systems with compatible integrated graphics. Use it when it gives the machine more breathing room than x264, then inspect the recording rather than assuming that hardware encoding automatically looks identical across systems.
AV1 hardware encoding can be a strong option when the destination platform and editing workflow support it. H.264 remains the safer compatibility choice when the recording must move through older editors, learning platforms or conferencing tools.
Encoder choice is a performance decision, not a brand preference. Keep CPU usage below roughly 70% where possible and make sure the GPU encode queue isn't staying saturated during the real workload.
The Quality, Max Quality and Max Performance controls change the balance between speed and bitrate efficiency. Pick Quality first. If OBS reports overload, use Max Performance or reduce the video workload before sacrificing an otherwise stable session.
Hardware | Recommended encoder | Quality vs Max Quality | Notes |
|---|---|---|---|
Modern multi-core CPU without useful hardware encoding | x264 | Start with , then test a slower option only if there is headroom | Watch CPU usage during capture and presentation |
NVIDIA RTX laptop or desktop | NVENC | Start with Quality, test Max Quality only when the GPU has spare capacity | AV1 is an option where the platform supports it |
Intel system with supported Arc or Iris Xe graphics | QuickSync | Prefer the quality preset that keeps the encode queue clear | Useful when the CPU is handling meeting or browser tasks |
Supported Radeon or Ryzen graphics | AMD AMF | Choose Quality before experimenting with heavier quality controls | Validate text and motion in a local recording |
Laptop with a loaded integrated GPU | x264 at a faster preset, or available hardware encoding | Prioritise stability over compression efficiency | Reduce resolution if the preview and application both stutter |
For a wider equipment decision, compare the encoder and capture requirements with this guide to live streaming equipment. The right encoder is the one that completes every frame while leaving enough capacity for the application you are presenting.
Matching Bitrate and Resolution to Your Upload Speed
Your upload speed is not the bitrate you should enter in OBS. Leave room for network variation, audio, other applications and the household devices sharing the connection. A UK training guide recommends using no more than 70% of maximum upload speed for streaming, then recording a 5 to 10 minute test clip before going live. (UK OBS training guidance)
Measure the connection more than once. Run a test at Speedtest, repeat it at a different time, and use the typical result rather than the best peak. If the connection changes sharply, choose the lower tier. A 720p30 stream that remains live is more useful than a 1080p60 stream that drops frames whenever somebody else starts a video call.
Use the lower setting when the network is uncertain
For a lecture or corporate training session, begin at 720p30 when the upload connection is unreliable. OBS specifically warns that 60 FPS is much more demanding than 30 FPS and that bitrate should reflect both upload speed and platform limits. (OBS Studio overview)
The following targets are practical starting points from UK OBS training guidance. They are not promises of identical quality on every platform. Motion, text density, camera detail and connection consistency still matter.
Upload speed (Mbps) | Streaming bitrate (kbps) | Resolution | Frame rate | Notes |
|---|---|---|---|---|
Variable or constrained connection | 3,000–4,000 | 1280×720 | 30 FPS | Safer choice for lectures, meetings and unstable broadband |
Variable connection with more motion | 4,500–5,000 | 1280×720 | 60 FPS | Use only after testing the encoder and network |
Stable connection for general delivery | 4,500–6,000 | 1920×1080 | 30 FPS | Good balance for slides, camera and demonstrations |
Strong connection and capable hardware | 6,000–9,000 | 1920×1080 | 60 FPS | Reserve for gameplay or genuinely fast motion |
In OBS, choose Output Mode > Advanced, set streaming Rate Control to CBR, enter the bitrate, then set the canvas and output resolution in the Video tab. Choose a downscale filter when the output is smaller than the canvas. For a text-heavy lecture, inspect small lettering after downscaling. A sharp 720p slide is preferable to a soft 1080p slide created by an overloaded workflow.
Streaming and recording are separate jobs. A local recording doesn't depend on upload speed, so its recording encoder and quality control can be chosen independently. The mistake is not recording at a higher local quality. The mistake is letting a live-stream preset dictate the quality of the file you keep.
Use this internet speed guide for streaming when you need to assess the connection before choosing a live profile. Test at the location where you will broadcast, not beside the router in a different room.
Audio Settings That Sound Clean in Lectures and Meetings
Poor audio makes a technically sharp lecture difficult to follow. Set Sample Rate to 48 kHz when your video and microphone workflow supports it, then keep the operating system, interface and OBS aligned. Mismatched sample rates can create drift or resampling problems that become obvious during a long seminar.
Choose Stereo for webinars that need separate left and right content. Choose Mono for spoken-word capture when the microphone is centred and the delivery doesn't need stereo width. For the AAC output, 160 kbps is a practical setting for a clear voice and a live presentation.
Build a small filter chain
Use only the filters that solve a real problem. A short chain is easier to troubleshoot than a stack of effects that all alter the same voice.
Noise Suppression: Start with RNNoise when a room has fan, keyboard or air-conditioning noise. It can use more processing than lighter suppression, so monitor the laptop during a live capture.
Noise Gate: Set the close threshold just above the room floor and the open threshold below normal speech. If the gate cuts off the first consonant of words, it is too aggressive.
Compressor: Use a moderate ratio and a threshold that catches loud peaks without flattening the voice. The aim is intelligibility, not a processed broadcast sound.
Don't add every filter because a tutorial lists it. Suppression, gating and compression can interact badly, especially when the microphone already has processing enabled. If the CPU is under load, avoid a heavy suppression mode until the rest of the configuration is stable.
Setting | Lecture Capture | Live Stream | Video Call |
|---|---|---|---|
Sample rate | 48 kHz | 48 kHz | Match the meeting and device path |
Channels | Mono for one speaker, Stereo for mixed sources | Stereo unless the show is voice-only | Mono for a single spoken source |
AAC output | 160 kbps | 160 kbps | Keep the meeting application's own processing in mind |
Noise suppression | RNNoise for persistent room noise | RNNoise only after testing CPU load | Use one clear suppression stage |
Noise Gate | Useful for pauses and keyboard noise | Light touch, if needed | Avoid a gate that clips short answers |
Compressor | Moderate control for consistent speech | Useful for presenters who move around the mic | Use carefully to preserve natural speech |
A USB lavalier should sit close enough to the speaker to keep the voice above room noise. A headset microphone often gives more consistent distance than a desk microphone. A condenser microphone can sound detailed, but it also captures fans, keys and room reflections, so placement matters more than adding filters.
Finally, open Advanced Audio Properties and check the Audio Monitoring dropdown for desktop audio. If the presenter needs to hear a return feed, select the appropriate monitoring route and test it with headphones. An incorrect monitoring choice can create echo, while a muted monitoring route can make the operator think the source has failed.
How to Test and Validate Your OBS Configuration
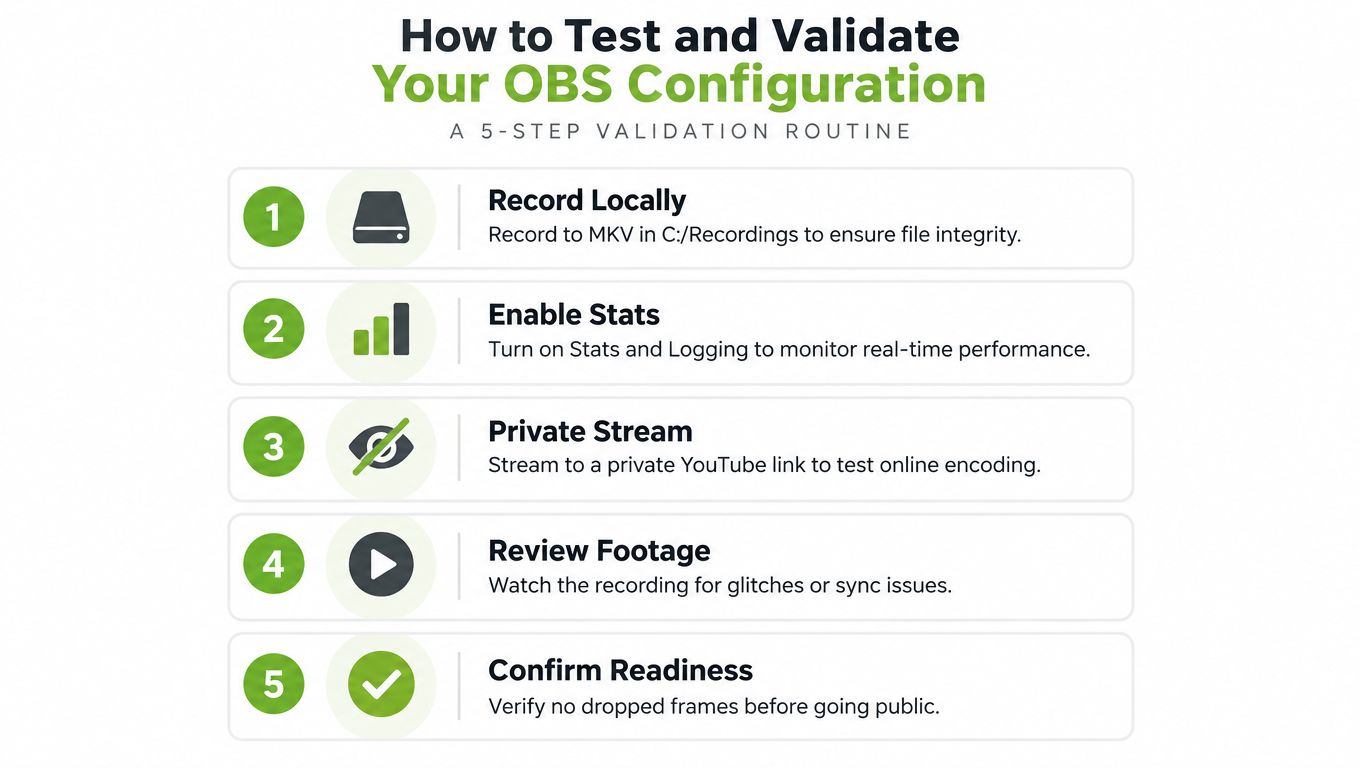
Never make the first real lecture your performance test. Record a controlled 5 to 10 minute clip, perform the same actions you will perform live, and include the busiest part of the presentation. Open slides, switch scenes, play the intended media and speak at normal volume.
Read the stats instead of guessing
Turn on the Stats dock and logging in OBS. The stats window separates several problems that look similar in the final video:
Dropped frames from network issues indicate that the connection or ingest path isn't carrying the stream consistently.
Skipped frames due to encoding lag point towards the selected encoder, preset or overloaded CPU.
Missed frames due to rendering lag suggest that OBS cannot compose the scene quickly enough, often because the GPU is busy.
CPU usage and average render time show whether the machine is approaching its limit before the picture visibly breaks.
The log file provides useful context around messages such as “skipped frames due to encoder lag” and “network issues”. Don't respond to both warnings by lowering bitrate. Network warnings call for a connection or output adjustment. Encoder warnings call for a different encoder, a lighter preset or a lower video workload.
Record to MKV in for the test. MKV protects the capture better if OBS or the computer stops unexpectedly. After checking the file, remux it to MP4 inside OBS when the destination requires MP4.
Review the file like an audience member
Open the recording in VLC and check the points that a settings panel can't reveal:
Lip sync: Clap once on camera and confirm that the audio spike lines up with the visible clap.
Text clarity: Pause on a slide and read the smallest important text.
Motion: Scrub across a scene change, cursor movement or shared video.
Audio consistency: Listen to quiet speech, loud speech and pauses.
File integrity: Play the beginning, middle and end without seeking errors.
For a practical installation and configuration walkthrough, use this guide to set up OBS. Once the profile works, duplicate it before experimenting. Keep one locked profile for live delivery and create a separate practice profile for new scenes, sources and encoders. That prevents a quick experiment from changing the settings used for the next class.
Platform-Specific Tweaks for YouTube, Zoom and Teams
One OBS profile for every platform is a trap. YouTube Live, Twitch, Zoom and Teams handle the same video feed differently, so configure OBS for the delivery method, not for a generic 1080p60 template. A lecture capture, a public broadcast and a composed meeting camera each need a different priority.
YouTube Live rewards a clean, stable source because YouTube re-encodes the broadcast for viewers. Use CBR, a two-second keyframe interval and 160 kbps AAC audio. Select the bitrate tier from the upload-speed section rather than pushing the highest setting your laptop can process. A stable source with readable slides is more useful than extra detail that arrives inconsistently.
Twitch is less forgiving when the upload route fluctuates. Keep the two-second keyframe interval and enable Dynamic Bitrate under Network when that option is available in your OBS setup. Dynamic Bitrate can prevent a temporary connection drop from becoming an immediate stream failure, but it does not repair overloaded Wi-Fi. Use wired Ethernet first when the setup allows it.
Zoom and Teams are meeting applications, not simple streaming endpoints. A virtual camera works when participants must receive the finished OBS scene as the camera feed. It sends video, however, not a complete microphone mix. Select the microphone separately in the meeting application and test the audio path before presenting.
For a presentation workflow, capture the meeting window in OBS and route only the required desktop or application audio. This gives you control over slides, demonstrations and overlays without assuming that the meeting application will interpret every OBS source correctly. If the laptop camera itself fails before OBS receives it, use this guide to fix laptop camera for Zoom to isolate the device problem.
Platform | Keyframe interval | Dynamic Bitrate | Platform-side behaviour |
|---|---|---|---|
YouTube Live | 2 seconds | Treat as a fallback, not a quality setting | YouTube re-encodes the broadcast, so source stability and slide detail matter |
Twitch | 2 seconds | Enable when upload conditions vary | Ingest is less tolerant of unstable routes and practical ingest is capped at 6,000 kbps |
Zoom | Platform-dependent | Not the main control | Zoom processes the meeting feed, so test the virtual camera and microphone separately |
Teams | Platform-dependent | Not the main control | Teams processes the meeting feed, so keep the composed scene simple and verify the received output |
For YouTube, use the bitrate tier selected in the upload-speed section. YouTube tolerates 4,500 to 9,000 kbps, while Twitch has a practical ingest limit of 6,000 kbps. Do not copy those values into a Zoom or Teams camera workflow.
Record to MKV during the session, then remux to MP4 when direct upload or a Teams recording hand-off requires it. MKV provides a safer recovery path if OBS or the computer stops unexpectedly. MEDIAL can manage browser-based video storage, editing, captions and integrations with learning platforms, Zoom and Microsoft Teams.
Quick Troubleshooting Checklist for Common OBS Problems
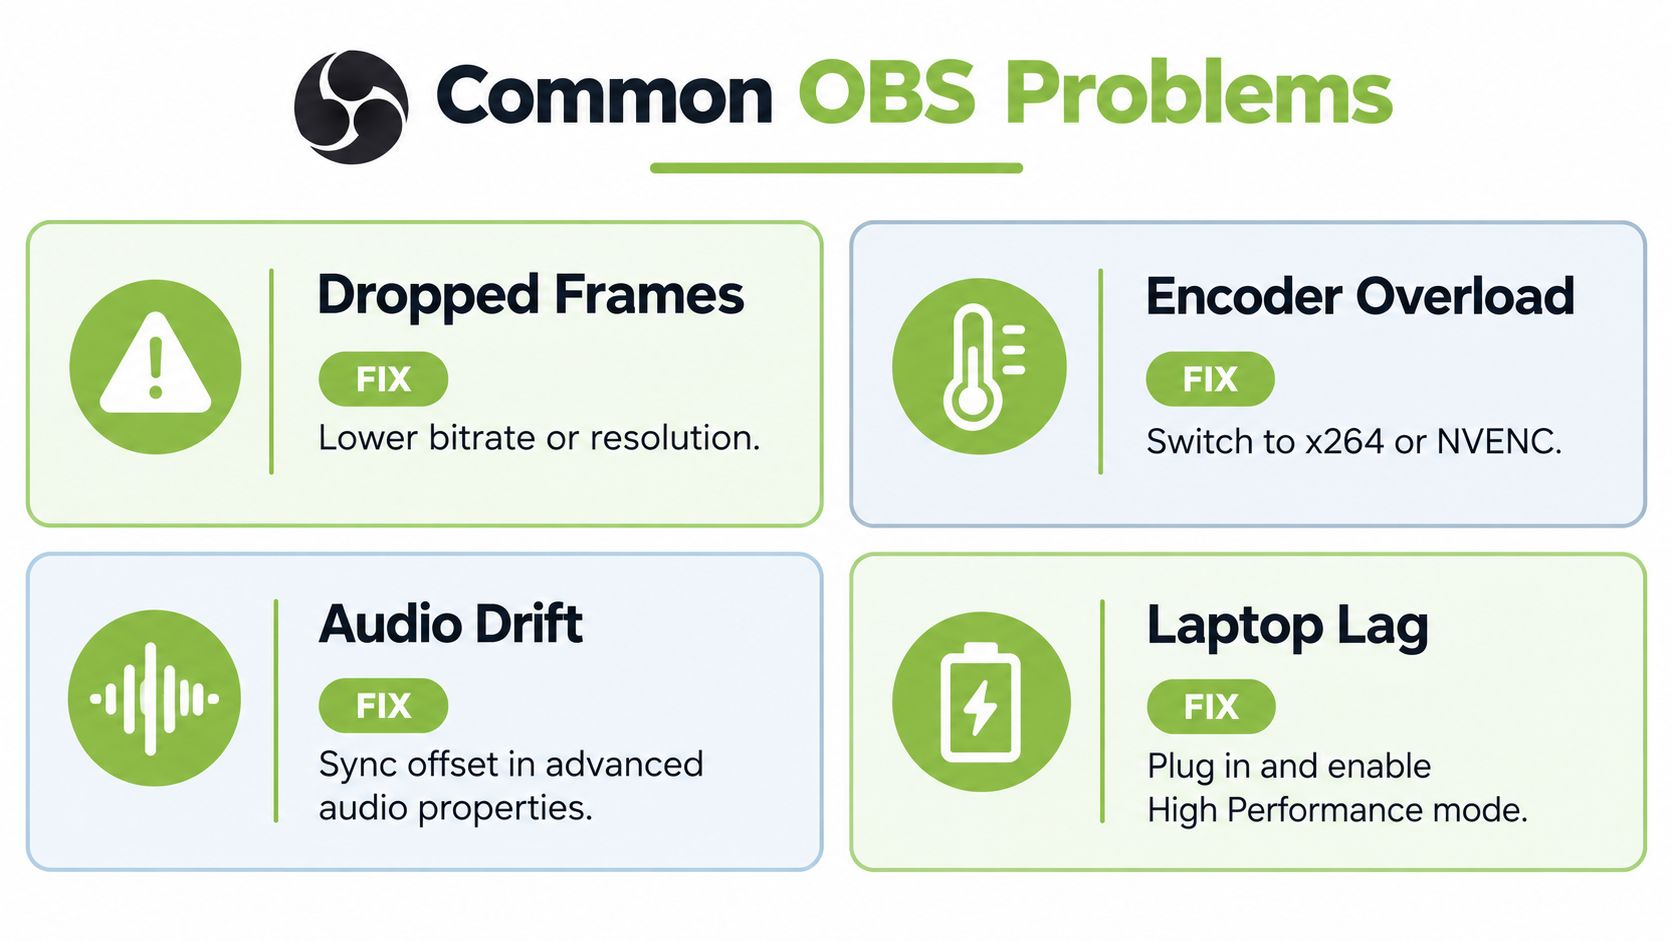
When OBS fails, identify the failure type before changing five settings at once. Use the stats dock and the log to distinguish the network, encoder, audio and thermal problems.
Dropped frames
Check the route: Stop other uploads, pause cloud synchronisation and test wired Ethernet instead of Wi-Fi.
Reduce the demand: Lower bitrate first if the ingest connection is saturated, then reduce output resolution if the connection still cannot hold the stream.
Check the platform: Twitch ingest performance can vary by route, so test the selected server and use Dynamic Bitrate when appropriate.
Repeat the test: A clean local recording doesn't prove that the live network path is stable.
Encoder overload
Read the log: “Skipped frames due to encoder lag” points to the encoder or preset, not automatically to the network.
Change the encoder: Try NVENC or QuickSync when supported. If x264 is the reliable option, use or a faster preset.
Reduce resolution first: Preserve the frame rate when motion matters, but lower output resolution before forcing the encoder to process more pixels than the laptop can sustain.
Check process priority: Give OBS sensible scheduling priority, but don't use extreme settings that starve the application being captured.
Audio drift
Align sample rates: Match OBS, the operating system and USB audio devices.
Check USB devices: A lavalier, headset and interface can each introduce a different clock or resampling path.
Use Advanced Audio Properties: Apply a sync offset only after confirming the drift is consistent, not caused by an overloaded video encoder.
Monitor the file: Compare a clap at the beginning and end of the recording to see whether the error grows.
Laptop overheating and lag
Clear the airflow: Keep fan vents open and remove the laptop from soft surfaces.
Use a powered stand: Extra airflow can help a sustained lecture capture, especially when the display, browser and encoder share the machine.
Reduce preview work: Hide the preview when you don't need it and cap unnecessary scene complexity.
Lower the workload: Move from 1080p60 to 1080p30 or 720p30 when the fan stays at full speed and the stats show rendering pressure.
A dependable baseline is NVENC or QuickSync when available, x264 or faster when CPU encoding is appropriate, CBR for live streaming, a two-second keyframe interval where the platform expects it, and no more than 70% of available upload capacity for the stream. Validate that baseline with a local test and a private online session before using it with students, customers or colleagues.
MEDIAL gives education and training teams a managed way to store, edit, caption and deliver the recordings created through workflows like these, with integrations for LMS platforms, Zoom and Microsoft Teams. Visit MEDIAL to explore the platform and arrange a demo for your lecture, webinar or corporate training workflow.
Comments