MEDIAL | Producing Content using an IOS device
- MEDIAL

- Feb 12, 2021
- 5 min read
Updated: Feb 18, 2021
Below is an article which explains best practice for producing content using IOS devices for use with MEDIAL. This article concentrates on the most important aspect of this subject i.e. making sure that the content that you produce is not unnecessarily large and therefore time consuming to upload while maintaining quality
Before you start recording....
The single most important thing that you can do to make sure that the size of your file is sensible (and not time consuming to upload) is to adjust the resolution that your IOS device will record at.
To do this, go to:
Settings -> Camera -> Record Video

You will then see a number of different options as below. Please select "720p HD at 30 fps" as below.

Selecting this option will make your video 10 times smaller than at 4K at 60fps. If you are concerned about quality you could select 1080p HD at 30 fps, this will make your video around 8 times smaller but quality will be slightly better.
IMPORTANT NOTE: Using a 4K resolution is not necessary for the vast majority of videos viewed on the web and will just make your file size very large and take up a lot of space on your device.
Other Things to Consider
Do you have enough storage left?
Another useful tip is to check how much storage space you actually have left on your device before starting to record. If you run out of space to record on your device, your recording will become corrupt and unusable so it is very important to check this before starting.
Go to Settings -> General -> iPhone/iPad Storage

Again this highlights the importance of adjusting the resolution (quality) at which you will record at.
You can do a rough calculation of the space you may require before you start based on the below figures.

For example, I will be recording a 20 minute video at 720p @ 30fps, and I have 4Gb (4000Mb) left of storage on my iPhone/iPad. The recording will use 800Mb of my iPhone/iPad storage = I have plenty of storage to accommodate the recording :-)
As opposed to:
I will be recording a 20 minute video at 4K @60fps, and I have 4Gb (4000Mb) left of storage on my iPhone / iPad. The recording will use 8Gb (8000Mb) of my iPhone/iPad storage = my device will be full after I am just 10 mins into my recording and I will need to re-shoot the video :-(
Do you have enough charge left in your device?
Either check that your device is fully charged or plugged into a power source before starting to record as again, should your device run out of battery during the recording, it is likely that the recording will be corrupt and unusable. Recording video is a taxing task for your device and will use a lot of power while you are doing it.
Orientation
Best practice when recording videos to combine, potentially compress and upload is to record all videos in LANDSCAPE
Combining Multiple Videos to create one Video
Once you have created your files on your IOS device the easiest way to combine multiple files and create one movie is to use iMovie on your iPhone or iPad
To download iMovie go to: https://apps.apple.com/gb/app/imovie/id377298193
Once you have downloaded iMovie click on the icon to open it and search for "iMovie" to locate it

Once you get into iMovie click on the large "+" icon

Then when the New Project dialogue appears select "Movie"

Then click on "Media" in the top left corner

Now click "Video"

Now go to "All" or whatever folder is most applicable e.g. "Recently Added" if you just shot your videos

You now need to select the videos that you wish to combine. First select the video by highlighting the video timeline so an orange outline appears around the edge of the video

Then click the tick button to select the video to be added to your new Movie
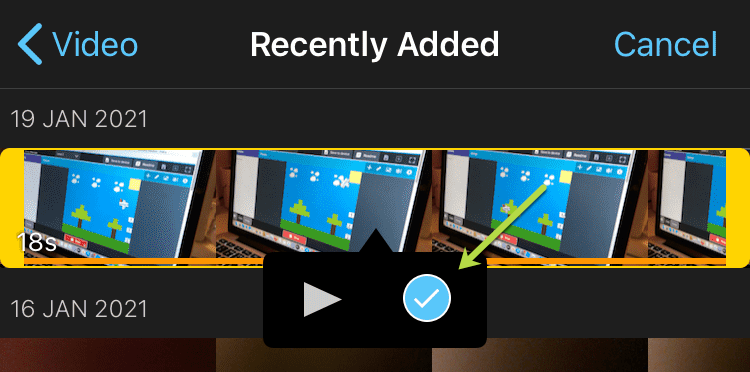
Repeat the select and tick process for all videos you want to combine together to make your new Movie

Then at the base of the page click Create Movie

On the next screen you can choose to edit your video, click Done once finished

Then click on the Upload icon at the base of the screen

At this point you will have a number of different options for sharing the Movie
AirDrop to a Mac
The easiest and simplest option is to AirDrop the Movie to a MacBook
Do this by selecting the option of whether to send the Video File or the Project. Send the Video File

Then choose the device you want to send it to, once this is selected you will see this screen

You will then get a message saying "Exporting Movie"

The Exported Movie will be stored in the Downloads folder on your MacBook once you click to accept the transfer (Open)

Other Options
Save Video
The Movie will be saved to your Camera Roll where you could choose to e-mail it to yourself through the Mail Application on your device. This will be dependent on size. Make sure you have used 720p resolution as mentioned above to ensure that the file is small enough to e-mail.
In the case that the attachment is too large you will be given the option to use MailDrop

You will receive an e-mail to download the link to the video from iCloud, simply click "Download Attachment" to download your file

Save to Dropbox or Google Drive
This will make the video available via a Dropbox or Google Drive Link for download to your computer where you can use a browser to upload the file to MEDIAL
This is what you will see when you choose to Save to Dropbox - Click Save

This is what you will see if you choose to Save the file to Google Drive - Click Upload

Tips for making your Videos even Smaller
Once you have your Movie download to and saved to your computer, you could choose to compress the file to make it even smaller.
NOTE: This is especially useful if you are uploading a large file to MEDIAL and you know that your internet connection is slow and/or unreliable
To do this, download Miro Convertor from http://www.mirovideoconverter.com/
NOTE: You can use Miro Convertor on a PC or a Mac and since it is an open source software it is therefore FREE to use
Once you have followed the on screen prompts to install it then click "Choose Files"

Select your file and then choose Apple from the drop down menu and select "Apple Universal" or "Apple TV"

Once you have selected that click to Convert

The new file will be saved to the following location:
Mac: /Users/YourName/Movies/Miro Video Converter
PC: Movies\Miro Video Converter
Dependent on how the file was produced originally, the resultant file could be up to 10 times smaller than the file you have produced in iMovie.
Conclusion
Simply choosing a different setting before you record and compressing your file using a third party tool could make your file up to 100 times smaller with little discernible difference when viewed on most devices. This makes the file easier to handle and markedly quicker to upload especially if you do not have a fast or reliable internet connection.
However, whichever method/advice you have used above you can then upload your video file via MEDIAL's upload facility. For specific advice on how to do this please visit: https://www.medial.com/blog/categories/teacher-student-guides
Comments